ant常见问题

如何通过scp将指定文件上传到服务器

主要使用scp任务,需要先下载jsch的jar包,例子如下:

1
2
3
<target name="scp.war">
<scp localFile="a.war" remoteTofile="remoteuser@remoteHost:/path/to/a.war" password="password"/>
</target>

然后运行:

1
ant -lib jsch-xxx.jar scp.war

正常会报一个Unknown host的错误,主要是因为目标机器在本机上没有finger,可通过以下方法解决:利用某台linux服务器,向目标机器发送ssh登录命令,然后在~/.ssh目录下把known_hosts文件中关于目标机器的信息串copy到本地的用户目录下的.ssh目录中的known_hosts文件中,windows下创建.ssh目录需要在命令行执行mkdir .ssh命令


利用pom.xml做依赖管理,使用ant下载依赖包

背景:构建服务器无法连通外网,也没有maven的私服,但又想使用pom.xml做包依赖管理
解决思路:通过maven-ant-tasks把依赖包下载到项目里
具体方法:

  • 下载maven-ant-tasks.jar放到本地,具体下载地址请见 http://maven.apache.org/ant-tasks/
  • build.xml中引入相关task
    1
    2
    3
    4
    5
    6
    7
    8
    9
    10
    11
    12
    13
    14
    15
    16
    17
    18
    19
    20
    21
    22
    23
    24
    25
    26
    27
    28
    29
    30
    31
    32
    33
    34
    <project xmlns:artifact="antlib:org.apache.maven.artifact.ant">
    <property name="maven-ant-jar.path" value="path/to/maven-ant-tasks.jar"/>
    <path id="maven-ant-tasks.classpath" path="${maven-ant-jar.path}"/>
    <typedef resource="org/apache/maven/artifact/ant/antlib.xml"
    uri="antlib:org.apache.maven.artifact.ant"
    classpathref="maven-ant-tasks.classpath"/>
    <!-- usescope 属性有包含关系,关系如下:
    compile - Includes scopes compile, system and provided
    runtime - Includes scopes compile and runtime
    test - Includes scopes system, provided, compile, runtime and test
    -->
    <artifact:dependencies filesetId="dependency.main.fileset" usescope="runtime">
    <pom file="pom.xml"/>
    </artifact:dependencies>
    <!-- scopes属性没有包含关系,需要显式指定包含的范围 -->
    <artifact:dependencies filesetId="dependency.test.fileset" scopes="test">
    <pom file="pom.xml"/>
    </artifact:dependencies>
    <target name="jars.update">
    <copy todir="${lib.main.dir}">
    <fileset rerid="dependency.main.fileset"/>
    <mapper type="flatten"/>
    </copy>
    <copy todir="${lib.test.dir}">
    <fileset rerid="dependency.test.fileset"/>
    <mapper type="flatten"/>
    </copy>
    </target>
    </project>

R-howto

R培训

商业理解和部署很重要


数据分析的基本步骤

  1. 明确要解决的问题类型(是要分类、发现关联还是预测),以确定使用哪种算法
    a. 分类(有监督):决策树、逻辑回归(二分)
    逻辑回归的解析和应用场景:http://wenku.baidu.com/link?url=Q36Op3RXf3qR2-MMejmUC8r99RzXeVlp5QYfRNy2NqqeRioao9yWcj3_wa0QHPS1m9WU0MioQiMwdaiCbW2sZ1ykQ4j_tKz_tEFnWx4fI-m
    
    b. 关联关系:关联规则(Aprior算法,基于投票或交易数据)、协同过滤(基于评分数据)
    c. 预测:线性回归
    d. 聚类(无监督):
  2. 算法思路
    a. 确定目标函数
    b. 模型评价

##rJava库的装载

  1. 设置,在Path变量中添加项
    1
    2
    3
    4
    %R_Home%\bin\x64
    %R_Home%\bin\x86
    取决于系统是64位还是32位。

安装rJava这个用于R与Java交互的Packages后,还需在Path变量中添加项

1
%R_Home%\library\rJava\jri

  1. 重要,JAVA_HOME要设置为jre的目录,设成JDK的不行!!

图形化交互Rattle

使用install.packages('rattle')进行安装

1
2
> library(rattle)
> rattle()


通过excel导入数据

1
2
3
4
5
6
7
# 先安装库并引用
>install.packages('xlsx')
>library(xlsx)
# 读取excel文件(适用于excel2007以上)
> x=read.xlsx('F:/tmp/R/Rtest.xlsx', 1)
> str(x)

判断线性回归方程的优度(贡献率)

最重要的标准:R平方

步骤

利用散点图先大致观察变量和响应变量的关系,再逐步增、减变量查看结果


决策树

分裂变量选择的原则: 选择该变量后,分裂后的子集分布和原来的差异明显;
树停止分裂的条件: 1. 层数超过阈值;2. 子集数据小于阈值;3. 子集各类比例超过阈值
选取变量的手段:通过信息熵——熵越大,不确定性越大(最大为1);熵越小,不确定性越小(最小为0)。每个变量计算条件熵,然后用总信息熵-条件熵,差值最大的,表示使用该变量进行分裂之后,不确定程度降低得最多(即越能确定),所以选取该条件作为该层的节点
连续性的变量:计算所有值两两之间的切分点,每个区间转换成一个类型值,然后按上述的原则计算各个切分点的信息熵。对于样本数量很多的时候,可以按每个n个切分点算一个熵

lift值:就是使用该策略时的响应数/随机策略时的响应数

Maven常见问题

如何设置代码编译版本

增加如下配置

1
2
3
4
5
6
7
8
9
10
11
12
13
14
<build>
<plugins>
...
<plugin>
<groupId>org.apache.maven.plugins</groupId>
<artifactId>maven-compiler-plugin</artifactId>
<version>3.3</version>
<configuration>
<source>1.7</source>
<target>1.7</target>
</configuration>
</plugin>
</plugins>
</build>

如何配置jetty插件

plugins段增加配置

1
2
3
4
5
6
7
8
9
<build>
<plugins>
<plugin>
<groupId>org.eclipse.jetty</groupId>
<artifactId>jetty-maven-plugin</artifactId>
<version>9.3.0.M1</version>
</plugin>
</plugins>
</build>

然后执行mvn jetty:run即可运行

使用jetty:run出现Timeout scan annotations的解决方法

现象mvn jetty:run之后,出现类似错误:

1
2
3
4
5
6
java.lang.Exception: Timeout scanning annotations
at org.eclipse.jetty.annotations.AnnotationConfiguration.scanForAnnotations(AnnotationConfiguration.java:576)
at org.eclipse.jetty.annotations.AnnotationConfiguration.configure(AnnotationConfiguration.java:446)
at org.eclipse.jetty.webapp.WebAppContext.configure(WebAppContext.java:473)
at org.eclipse.jetty.webapp.WebAppContext.startContext(WebAppContext.java:1331)
......

但使用 mvn clean package,将打包后的war包放到tomcat下能正常运行

解决方法:增加jetty启动时对annotations的最长扫描时间

1
mvn jetty:run -Dorg.eclipse.jetty.annotations.maxWait=180


解决编码问题

问题1:多个plugin,例如maven-resources、maven-compile、maven-site等都需要设置encoding,解决方案:在pom.xml中设置一个属性:

1
2
3
<properties>
<project.build.sourceEncoding>UTF-8</project.build.sourceEncoding>
</properties>

详见:http://maven.apache.org/general.html#encoding-warning

问题2:单元测试时,控制台输出的中文乱码,原因是maven-surefire-plugin使用的编码和控制台的不一致导致(git/cygwin用户的是UTF-8, windows命令行用的是GBK),解决方案:

首先在pom.xml设置(假设统一使用UTF-8

1
2
3
4
5
6
7
8
9
10
11
12
13
<build>
<plugins>
......
<plugin>
<groupId>org.apache.maven.plugins</groupId>
<artifactId>maven-surefire-plugin</artifactId>
<version>2.18.1</version>
<configuration>
<argLine>-Dfile.encoding=UTF-8</argLine>
</configuration>
</plugin>
</plugins>
</build>

然后在执行命令

1
mvn -Dfile.encoding=UTF-8 clean test

原则就是保证两者使用的编码一致


如何禁止cobertura:cobertura-integration-test运行

cobertura主要用于产生代码测试覆盖率的报告,可以配置到reporting节点,在site的生命周期中调用。但在site的生命周期中默认会先后调用cobertura:coberturacobertura:cobertura-integration-test两个goal,在运行cobertura:cobertura-integration-test的时候一般需要将cobertura.jar放到war包中,如果要实现该功能的话,要么把cobertura.jar加到依赖里,要么按照官网需要在很多地方做配置。考虑到集成测试生成的覆盖率没有太大意义,因此可以设置在site生命周期里不运行cobertura:cobertura-integration-test,设置如下:

1
2
3
4
5
6
7
8
9
10
11
12
13
14
15
16
17
18
19
<reporting>
<plugins>
...
<plugin>
<groupId>org.codehaus.mojo</groupId>
<artifactId>cobertura-maven-plugin</artifactId>
<version>2.7</version>
<!-- 关键一步 -->
<reportSets>
<reportSet>
<reports>
<report>cobertura</report>
</reports>
</reportSet>
</reportSets>
</plugin>
</plugins>
</reporting>


如何集成Jboss进行集成测试

思路主要来自:http://www.infoq.com/cn/news/2011/03/xxb-maven-5-integration-test/ Maven实战(五)——自动化Web应用集成测试

首先需要在测试前把应用服务器启动起来,并把war包部署到服务器上,这个主要是把jboss-as:startjboss-as:deploy这两个goal绑定到pre-integration-test阶段;另外在测试完之后要把服务器停掉,这个主要把jboss-as:shutdown绑定到post-integration-test阶段

1
2
3
4
5
6
7
8
9
10
11
12
13
14
15
16
17
18
19
20
21
22
23
24
25
26
27
<build>
<plugin>
<groupId>org.jboss.as.plugins</groupId>
<artifactId>jboss-as-maven-plugin</artifactId>
<version>7.7.Final</version>
<executions>
<excution>
<id>jboss-start-deploy</id>
<phase>pre-integration-test</phase>
<goals>
<goal>start</goal>
<goal>deploy</goal>
</goals>
<configuration>
<name>${project.artifactId}.${project.packaging}</name>
</configuration>
</excution>
<excution>
<id>jboss-shutdown</id>
<phase>post-integration-test</phase>
<goals>
<goal>shtudown</goal>
</goals>
</excution>
</executions>
</plugin>
</build>

另外,需要将集成测试的类命名为不含有Test(例如改为以*IT.java命名),否则在单元测试阶段会执行这些测试案例,之后需要将这些测试的执行绑定到integration-test阶段:

1
2
3
4
5
6
7
8
9
10
11
12
13
14
15
16
17
18
19
20
21
<build>
<plugin>
<groupId>org.apache.maven.plugins</groupId>
<artifactId>maven-surefire-plugin</artifactId>
<version>2.18.1</version>
<executions>
<excution>
<id>run-integration-test</id>
<phase>integration-test</phase>
<goals>
<goal>test</goal>
</goals>
<configuration>
<includes>
<include>**/*IT.java</include>
</includes>
</configuration>
</excution>
</executions>
</plugin>
</build>


是否可以在setting.xml中配置distributeManager

答案是:否,只能在pom.xml中配置,但可以通过profile方式进行灵活配置


如何在每次构建出来的war包名中包含时间信息

增加如下属性:

1
<maven.build.timestamp.format>yyyyMMddHHmmss</maven.build.timestamp.format>

然后在包信息中利用${maven.build.timestamp}属性即可,但要注意该属性得到的时间是没有时区信息的


在MANIFEST.MF文件中增加自定义信息

配置如下:

1
2
3
4
5
6
7
8
9
10
11
12
13
<plugin>
<groupId>org.apache.maven.plugins</groupId>
<artifactId>maven-war-plugin</artifactId>
<version>2.6</version>
<configuration>
<archive>
<manifestEntries>
<Build-Number>${versionNumber}</Build-Number>
<Built-By>${user.name}</Built-By>
</manifestEntries>
</archive>
</configuration>
</plugin>


如何将依赖包都打到jar里

方法:使用maven-assembly-plugin,主页为: http://maven.apache.org/plugins/maven-assembly-plugin/
pom.xml中添加如下配置:

1
2
3
4
5
6
7
8
9
10
11
12
13
14
15
16
17
18
19
20
21
22
<build>
<plugins>
<plugin>
<artifactId>maven-assembly-plugin</artifactId>
<version>2.6</version>
<executions>
<execution>
<id>xxx<id>
<phase>package</phase>
<goals>
<goal>single</goal>
</goals>
<configuration>
<descriptors>
<descriptor>assembly.xml</descriptor> <!-- 具体组装的描述文件 -->
</descriptors>
</configuration>
</execution>
</executions>
</plugin>
</plugins>
</build>

根据上面配置的路径,在同一层目录新建assembly.xml

1
2
3
4
5
6
7
8
9
10
11
12
13
14
15
16
17
18
19
20
21
22
23
<assembly xmlns="http://maven.apache.org/plugins/maven-assembly-plugin/assembly/1.1.3" xmlns:xsi="http://www.w3.org/2001/XMLSchema-instance"
xsi:schemaLocation="http://maven.apache.org/plugins/maven-assembly-plugin/assembly/1.1.3 http://maven.apache.org/xsd/assembly-1.1.3.xsd">
<id>xxx</id> <!-- 这个会附加到最终构件的文件名后面 -->
<formats>
<format>jar</format>
</formats>
<includeBaseDirectory>false</includeBaseDirectory>
<fileSets>
<fileSet>
<outputDirectory>/</outputDirectory>
<directory>target/classes</directory> <!-- 将target/classes目录下的所有文件到打包到根目录下 -->
</fileSet>
</fileSets>
<dependencySets>
<dependencySet>
<outputDirectory>lib</outputDirectory> <!-- 放到压缩包里的lib目录 -->
<scope>runtime</scope> <!-- 选取runtime范围的依赖包 -->
<useProjectArtifact>false</useProjectArtifact> <!-- 是否将构建出来的jar包也放到依赖里,默认是true -->
</dependencySet>
</dependencySets>
</assembly>

assembly.xml可用配置项详见: http://maven.apache.org/plugins/maven-assembly-plugin/assembly.html

打包的最终结果是所有依赖包以及本身的包都会打到压缩包的lib目录中

如果只是想把项目依赖的class文件都打到jar包里,按以下配置即可:

1
2
3
4
5
6
7
8
9
10
11
12
13
<build>
<plugins>
<plugin>
<artifactId>maven-assembly-plugin</artifactId>
<version>2.6</version>
<configuration>
<descriptorRefs>
<descriptorRef>jar-with-dependencies</descriptorRef>
</descriptorRefs>
</configuration>
</plugin>
</plugins>
</build>

jersey-stepbystep

创建框架

执行命令,创建一个最基础的应用脚手架

1
2
3
4
mvn archetype:generate -DarchetypeArtifactId=jersey-quickstart-webapp
-DarchetypeGroupId=org.glassfish.jersey.archetypes -DinteractiveMode=false
-DgroupId=com.example -DartifactId=simple-service-webapp -Dpackage=com.example
-DarchetypeVersion=2.16

该脚手架使用的是servlet 2.5,主要关注两个地方:

  1. web.xml要声明入口的servlet以及要扫描的资源

    1
    2
    3
    4
    5
    6
    7
    8
    9
    10
    11
    12
    13
    14
    15
    <web-app version="2.5" xmlns="http://java.sun.com/xml/ns/javaee" xmlns:xsi="http://www.w3.org/2001/XMLSchema-instance" xsi:schemaLocation="http://java.sun.com/xml/ns/javaee http://java.sun.com/xml/ns/javaee/web-app_2_5.xsd">
    <servlet>
    <servlet-name>Jersey Web Application</servlet-name>
    <servlet-class>org.glassfish.jersey.servlet.ServletContainer</servlet-class>
    <init-param>
    <param-name>jersey.config.server.provider.packages</param-name>
    <param-value>com.example</param-value>
    </init-param>
    <load-on-startup>1</load-on-startup>
    </servlet>
    <servlet-mapping>
    <servlet-name>Jersey Web Application</servlet-name>
    <url-pattern>/webapi/*</url-pattern>
    </servlet-mapping>
    </web-app>
  2. pom.xml使用的依赖包为

    1
    2
    3
    4
    5
    6
    7
    8
    9
    10
    11
    12
    13
    14
    15
    16
    17
    18
    <dependencyManagement>
    <dependencies>
    <dependency>
    <groupId>org.glassfish.jersey</groupId>
    <artifactId>jersey-bom</artifactId>
    <version>2.17</version>
    <type>pom</type>
    <scope>import</scope>
    </dependency>
    </dependencies>
    </dependencyManagement>
    <dependencies>
    <dependency>
    <groupId>org.glassfish.jersey.containers</groupId>
    <artifactId>jersey-container-servlet-core</artifactId>
    </dependency>
    </dependencies>

如果使用的是servlet 3.0,则以上两个地方分别为:

1
2
3
4
5
6
7
8
9
10
11
12
13
14
15
16
web.xml
<web-app version="3.0"
xmlns="http://java.sun.com/xml/ns/javaee"
xmlns:xsi="http://www.w3.org/2001/XMLSchema-instance">
<!-- Servlet declaration can be omitted in which case
it would be automatically added by Jersey -->
<servlet>
<servlet-name>javax.ws.rs.core.Application</servlet-name>
</servlet>
<servlet-mapping>
<servlet-name>javax.ws.rs.core.Application</servlet-name>
<url-pattern>/webapi/*</url-pattern>
</servlet-mapping>
</web-app>
1
2
3
4
5
pom.xml
<dependency>
<groupId>org.glassfish.jersey.containers</groupId>
<artifactId>jersey-container-servlet</artifactId>
</dependency>

当然,上述web.xml中的入口也可以配置成Application的子类,并在该子类中声明好各种配置信息,那样在web.xml中就不需要再配置了,对servlet2.5,可以只保留空的web.xml;对于servlet3.0,可以不需要web.xml


添加响应GET的rest服务

增加一个类,声明@Path注解

1
2
3
4
5
@Path("/item")
public class ItemService {
......
}

添加一个方法响应GET请求

1
2
3
4
5
6
7
8
9
@Path("/item")
public class ItemService {
@GET
@Produces(MediaType.APPLICATION_JSON)
public String get() {
return "item1";
}
}

web.xml中添加入口servlet的配置

1
2
3
4
5
6
7
8
9
10
11
12
13
<servlet>
<servlet-name>Jersey Web Application</servlet-name>
<servlet-class>org.glassfish.jersey.servlet.ServletContainer</servlet-class>
<init-param>
<param-name>jersey.config.server.provider.packages</param-name>
<param-value>com.louz.gds</param-value>
</init-param>
<load-on-startup>1</load-on-startup>
</servlet>
<servlet-mapping>
<servlet-name>Jersey Web Application</servlet-name>
<url-pattern>/webapi/*</url-pattern>
</servlet-mapping>

访问http://localhost:8080/simple-service-webapp/webapi/item即可看到页面显示item1

还可以在方法中声明子资源

1
2
3
4
5
6
@GET
@Path("{id}")
@Produces(MediaType.APPLICATION_JSON)
public String getById(@PathParam("id") String id) {
return id;
}

访问http://localhost:8080/simple-service-webapp/webapi/item/1即可看到页面显示1


如何接收POST请求

1. 使用JSON-P

首先需要增加对json的支持,先在pom.xml增加如下的依赖

1
2
3
4
<dependency>
<groupId>org.glassfish.jersey.media</groupId>
<artifactId>jersey-media-json-processing</artifactId>
</dependency>

后台的service方法:

1
2
3
4
5
6
7
@POST
@Produces(MediaType.APPLICATION_JSON)
@Consumes(MediaType.APPLICATION_JSON)
public JsonObject getItem(JsonObject item) { // 使用JsonObject接收请求的json串
System.out.println(item);
return item;
}

2. 使用MOXy

首先需要增加对json的支持,先在pom.xml增加如下的依赖

1
2
3
4
<dependency>
<groupId>org.glassfish.jersey.media</groupId>
<artifactId>jersey-media-moxy</artifactId>
</dependency>

后台的service方法:

1
2
3
4
5
6
7
@POST
@Produces(MediaType.APPLICATION_JSON)
@Consumes(MediaType.APPLICATION_JSON)
public Item getItem(Item item) {
System.out.println(item.getId());
return item;
}

注意

无论是JSON-P还是MOXy,对客户端传过来的json串都有比较严格的格式要求,如果不符合的话,会报参数解析出错或者其他奇奇怪怪的错,正确的json串格式应该是:
{"属性名1": 值1, "属性名2": 值2}属性名两边的双引号一定要有!可以利用JSON.stringify(jsonObj)方法对json对象进行字符串化,以下是使用jQuery的前端代码样例:

1
2
3
4
5
6
7
8
9
10
11
$.ajax({
url: "webapi/item",
type: "POST",
// data: JSON.stringify({id: 1}), 效果与下一行的一样
data: '{"id": 1}',
success: function (data) {
alert(data.id);
},
contentType: "application/json",
dataType: "json"
});


如何做单元测试

下面例子使用JSON-P进行描述。首先在pom.xml增加jersey的单元测试框架依赖:

1
2
3
4
5
6
7
8
9
10
11
<dependency>
<groupId>org.glassfish.jersey.test-framework</groupId>
<artifactId>jersey-test-framework-core</artifactId>
<scope>test</scope>
</dependency>
<dependency>
<groupId>org.glassfish.jersey.test-framework.providers</groupId>
<artifactId>jersey-test-framework-provider-grizzly2</artifactId>
<scope>test</scope>
</dependency>

编写测试类(继承JerseyTest类)即可

1
2
3
4
5
6
7
8
9
10
11
12
13
14
15
16
17
18
19
20
21
public class ItemServiceTest extends JerseyTest {
@Override
protected Application configure() {
final ResourceConfig config = new ResourceConfig(GridStrategyResource.class);
// 为便于调试,一般启用以下两个选项
enable(TestProperties.LOG_TRAFFIC);
enable(TestProperties.DUMP_ENTITY);
return config;
}
@Test
public void testPostItem() {
JsonObject doc = Json.createObjectBuilder()
.add("id", "1")
.build();
final Response response = target("item").request(MediaType.APPLICATION_JSON_TYPE).post(Entity.json(doc));
System.out.println(response);
assertEquals(200, response.getStatus());
}
}

与spring集成

首先在pom.xml引入相关依赖:

1
2
3
4
5
6
7
8
9
10
11
12
13
14
15
16
17
18
19
20
21
22
23
24
25
26
27
28
29
30
31
32
33
34
35
36
37
38
39
40
41
42
43
44
45
46
47
48
49
50
51
52
53
54
55
56
57
58
59
60
<dependencyManagement>
<dependencies>
...
<dependency>
<groupId>org.springframework</groupId>
<artifactId>spring-framework-bom</artifactId>
<version>3.2.13.RELEASE</version>
<type>pom</type>
<scope>import</scope>
</dependency>
</dependencies>
</dependencyManagement>
...
<dependencies>
<dependency>
<groupId>org.glassfish.jersey.ext</groupId>
<artifactId>jersey-spring3</artifactId>
</dependency>
<dependency>
<groupId>org.springframework</groupId>
<artifactId>spring-core</artifactId>
<exclusions>
<exclusion>
<groupId>commons-logging</groupId>
<artifactId>commons-logging</artifactId>
</exclusion>
</exclusions>
</dependency>
<dependency>
<groupId>org.slf4j</groupId>
<artifactId>jcl-over-slf4j</artifactId>
<version>${slf4j.version}</version>
</dependency>
<dependency>
<groupId>org.slf4j</groupId>
<artifactId>slf4j-api</artifactId>
<version>${slf4j.version}</version>
</dependency>
<dependency>
<groupId>org.slf4j</groupId>
<artifactId>slf4j-log4j12</artifactId>
<version>${slf4j.version}</version>
</dependency>
<dependency>
<groupId>log4j</groupId>
<artifactId>log4j</artifactId>
<version>1.2.17</version>
</dependency>
<dependency>
<groupId>org.springframework</groupId>
<artifactId>spring-web</artifactId>
</dependency>
</dependencies>

web.xml声明spring的配置文件位置

1
2
3
4
5
6
7
8
<listener>
<listener-class>org.springframework.web.context.ContextLoaderListener</listener-class>
</listener>
<context-param>
<param-name>contextConfigLocation</param-name>
<param-value>classpath:applicationContext.xml</param-value>
</context-param>

增加spring的配置文件:

1
2
3
4
5
6
7
8
9
10
11
12
<?xml version="1.0" encoding="UTF-8"?>
<beans xmlns="http://www.springframework.org/schema/beans"
xmlns:xsi="http://www.w3.org/2001/XMLSchema-instance"
xmlns:context="http://www.springframework.org/schema/context"
xsi:schemaLocation="
http://www.springframework.org/schema/beans
http://www.springframework.org/schema/beans/spring-beans.xsd
http://www.springframework.org/schema/context
http://www.springframework.org/schema/context/spring-context.xsd">
<context:component-scan base-package="com.louz.gds"/>
</beans>

Spring的bean可以在上面的配置文件中声明,也可以通过@Component/@Repository/@Service/@Controller的方式声明。

Jersey的资源类注入Spring的bean可以通过以下方式:

1
2
3
4
5
6
7
8
9
10
11
12
13
14
15
16
17
18
19
@Path("/item")
public class ItemService {
// @Resource(name = "itemDao") 如果该类没有声明成@Component,@Resource无法生效
@Autowired
@Qualifier("itemDao") // @Autowired默认按类注入,使用@Qualifier可以按bean名称注入
// @Inject
// @Named("itemDao") // 与使用@Autowired+@Qualifier等效
private ItemDao myItemDao;
...
}
@Repository(value = "itemDao")
public class ItemDao {
public void saveItem(JsonObject item) {
System.out.println("save in dao");
}
}

注意,当Jersey与spring集成测试时,Jersey容器默认加载classpath:applicationContext.xml文件作为spring的配置文件,如果要加载指定文件,需要做以下处理:

1
2
3
4
5
6
7
8
9
10
public class ResourceTest extends JerseyTest {
@Override
protected Application configure() {
final ResourceConfig config = new ResourceConfig(Resource.class);
config.property("contextConfigLocation", "classpath:my.spring.xml"); // 该参数名和值与web.xml里配置的一致
return config;
}
......

centos-howto

yum使用本地光盘作为源

挂载CentOS光盘

1
2
mkdir /mnt/cdrom
mount -t iso9660 /dev/cdrom /mnt/cdrom

移除网络源

1
2
3
cd /etc/yum.repos.d/
mv CentOS-Base.repo CentOS-Base.repo.bak
mv CentOS-Debuginfo.repo CentOS-Debuginfo.repo.bak

增加本地源配置

1
2
cp CentOS-Media.repo My.repo
vi My.repo

以下是My.repo的内容

1
2
3
4
5
6
[c6]
name=CentOS-$releasever - Media
baseurl=file:///mnt/cdrom/
gpgcheck=1 #0表示不作校验, 1表示要校验
enabled=1 #0表示不启用该REPO, 1表示启用
gpgkey=file:///mnt/cdrom/RPM-GPG-KEY-CentOS-6 #gpgcheck=1时需要该配置

验证
执行yum list

1
2
3
4
5
6
7
8
9
10
11
[root@localhost cdrom]# yum list | more
Loaded plugins: fastestmirror, security
Loading mirror speeds from cached hostfile
Installed Packages
ConsoleKit.i686 0.4.1-3.el6 @anaconda-CentOS-201311271240.i386/6.5
ConsoleKit-libs.i686 0.4.1-3.el6 @anaconda-CentOS-201311271240.i386/6.5
MAKEDEV.i686 3.24-6.el6 @anaconda-CentOS-201311271240.i386/6.5
SDL.i686 1.2.14-3.el6 @anaconda-CentOS-201311271240.i386/6.5
abrt.i686 2.0.8-21.el6.centos @anaconda-CentOS-201311271240.i386/6.5
abrt-addon-ccpp.i686 2.0.8-21.el6.centos @anaconda-CentOS-201311271240.i386/6.5
......

出现以上信息即表示repo正常添加

HTTP FAQ

如何请求部分内容

在请求头中利用Range参数

1
2
3
GET /aa.jpg HTTP/1.1
Host: www.example.com
Range: bytes =1001-2000

响应报文类似如下:

1
2
3
4
5
HTTP/1.1 206 Partial Content
Date: xxx
Content-Range: bytes 1001-2000/2000
Content-Length: 1000
Content-Type: image/jpeg

跨域获取数据

ajax跨域取数据时,注意2点:

  1. http状态可以获取到
  2. 结果获取不到

sqoop-howto

Sqoop主要用于在Hadoop与传统关系型数据库之间进行数据传递

##帮助命令
$SQOOP_HOME/bin/sqoop help <command>

##从Mysql导入数据到HDFS

首先先把mysql的jdbc驱动copy到$SQOOP_HOME/lib目录

1
2
3
4
5
6
7
8
9
10
11
12
13
14
15
16
17
[hduser@hadoop2 lib]$ pwd
/usr/local/share/applications/sqoop-1.4.5.bin__hadoop-2.0.4-alpha/lib
[hduser@hadoop2 lib]$ l
total 5144
-rw-rw-r--. 1 root root 224277 Aug 2 2014 ant-contrib-1.0b3.jar
-rw-rw-r--. 1 root root 36455 Aug 2 2014 ant-eclipse-1.0-jvm1.2.jar
-rw-rw-r--. 1 root root 400680 Aug 2 2014 avro-1.7.5.jar
-rw-rw-r--. 1 root root 170570 Aug 2 2014 avro-mapred-1.7.5-hadoop2.jar
-rw-rw-r--. 1 root root 241367 Aug 2 2014 commons-compress-1.4.1.jar
-rw-rw-r--. 1 root root 109043 Aug 2 2014 commons-io-1.4.jar
-rw-rw-r--. 1 root root 706710 Aug 2 2014 hsqldb-1.8.0.10.jar
-rw-rw-r--. 1 root root 232248 Aug 2 2014 jackson-core-asl-1.9.13.jar
-rw-rw-r--. 1 root root 780664 Aug 2 2014 jackson-mapper-asl-1.9.13.jar
-rw-r--r--. 1 root root 969020 Jul 8 18:06 mysql-connector-java-5.1.32-bin.jar
-rw-rw-r--. 1 root root 29555 Aug 2 2014 paranamer-2.3.jar
-rw-rw-r--. 1 root root 1251514 Aug 2 2014 snappy-java-1.0.5.jar
-rw-rw-r--. 1 root root 94672 Aug 2 2014 xz-1.0.jar

执行命令查看当前Mysql有哪些数据库

1
bin/sqoop list-databases --connect jdbc:mysql://localhost/test --username mysql

会看到类似的输出,最后两行就是当前Mysql中的数据库列表

1
2
3
4
5
6
7
8
9
10
11
12
13
14
15
16
[hduser@hadoop2 sqoop-1.4.5.bin__hadoop-2.0.4-alpha]$ bin/sqoop list-databases --connect jdbc:mysql://localhost/test --username mysql
Warning: /usr/local/share/applications/sqoop-1.4.5.bin__hadoop-2.0.4-alpha/../hcatalog does not exist! HCatalog jobs will fail.
Please set $HCAT_HOME to the root of your HCatalog installation.
Warning: /usr/local/share/applications/sqoop-1.4.5.bin__hadoop-2.0.4-alpha/../accumulo does not exist! Accumulo imports will fail.
Please set $ACCUMULO_HOME to the root of your Accumulo installation.
Warning: /usr/local/share/applications/sqoop-1.4.5.bin__hadoop-2.0.4-alpha/../zookeeper does not exist! Accumulo imports will fail.
Please set $ZOOKEEPER_HOME to the root of your Zookeeper installation.
14/07/08 18:23:15 INFO sqoop.Sqoop: Running Sqoop version: 1.4.5
14/07/08 18:23:15 INFO manager.MySQLManager: Preparing to use a MySQL streaming resultset.
SLF4J: Class path contains multiple SLF4J bindings.
SLF4J: Found binding in [jar:file:/usr/local/share/applications/hadoop-2.2.0/share/hadoop/common/lib/slf4j-log4j12-1.7.5.jar!/org/slf4j/impl/StaticLoggerBinder.class]
SLF4J: Found binding in [jar:file:/usr/local/share/applications/hbase-0.98.2-hadoop2/lib/slf4j-log4j12-1.6.4.jar!/org/slf4j/impl/StaticLoggerBinder.class]
SLF4J: See http://www.slf4j.org/codes.html#multiple_bindings for an explanation.
SLF4J: Actual binding is of type [org.slf4j.impl.Log4jLoggerFactory]
information_schema
test

执行如下命令可以将users表的数据导入到HDFS的/sqoop/import/users目录
注意:若users表没有主键,则必须指定--split-by参数或-m 1参数

1
bin/sqoop import --connect jdbc:mysql://localhost/test --username mysql --table users --split-by id

##从Mysql导入数据到HBase

##从HDFS导出数据到Mysql

java-regex

Matcher的Group使用

正则表达式中,()表示一个分组,使用分组可以将一段文本按正则表达式解析成多段(多个分组),以下是演示代码:

1
2
3
4
5
6
7
8
9
10
11
12
13
14
15
16
17
18
19
import java.util.regex.Matcher;
import java.util.regex.Pattern;
public class RegexMatchGroup {
/**
* @param args
*/
public static void main(String[] args) {
Pattern p = Pattern.compile("(.*),(.*),(.*),(.*)"); // 4组文本按,进行分割
Matcher m = p.matcher("user1,tom,m,23");
System.out.println("matcher groupCount = " + m.groupCount());
if (m.matches()) { // 必须先执行该方法,才能真正将文本分组分割
for (int i = 0; i < m.groupCount(); i++) {
System.out.println("group[" + (i+1) + "] = " + m.group(i + 1)); // Matcher的group从1开始记数
}
}
}
}

运行结果:

1
2
3
4
5
matcher groupCount = 4
group[1] = user1
group[2] = tom
group[3] = m
group[4] = 23

flume-howto

Flume是一个高可用的,分布式的海量日志采集、聚合和传输系统,Flume支持在日志系统中定制各类数据发送方,用于收集数据;同时,Flume提供对数据进行简单处理,并写到各种数据接受方(可定制)的能力

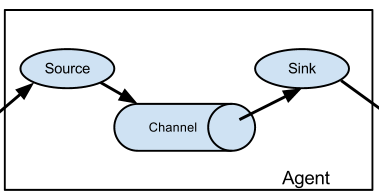
Flume的基本结构:agent = source(源)+ channel(类似缓存) + sink(目的)
Flume的基本结构

每个agent由source、channel、sink组成,agent可以任意组合

Flume支持的源:Avro、Thrift、Exec、JMS、目录、NetCat、Syslog、Http、自定义source

Flume支持的sink:HDFS、控制台输出、Avro、Thrift、IRC、本地文件、HBase、Apache Solr、自定义输出

Flume支持的channel类型:内存、数据库(目前仅支持Derby)、本地文件、自定义channel

##1. 一个简单例子
conf目录新建flume-louz.conf文件,内容如下:

1
2
3
4
5
6
7
8
9
10
11
12
13
14
15
16
17
18
19
20
21
22
23
24
25
26
agent.sources = r1
agent.channels = c1
agent.sinks = k1
# For each one of the sources, the type is defined
agent.sources.r1.type = netcat
agent.sources.r1.bind = localhost
agent.sources.r1.port = 44444
# The channel can be defined as follows.
agent.sources.r1.channels = c1
# Each sink's type must be defined
agent.sinks.k1.type = logger
#Specify the channel the sink should use
agent.sinks.k1.channel = c1
# Each channel's type is defined.
agent.channels.c1.type = memory
# Other config values specific to each type of channel(sink or source)
# can be defined as well
# In this case, it specifies the capacity of the memory channel
agent.channels.c1.capacity = 1000
agent.channels.c1.transactionCapacity = 100

配置完后,运行

1
bin/flume-ng agent --conf conf -f conf/flume-louz.conf -n agent -Dflume.root.logger=INFO,console

然后打开另一个控制台,输入命令telnet localhost 44444,得到如下输出

1
2
3
4
5
6
7
8
[hduser@hadoop2 conf]$ telnet localhost 44444
Trying ::1...
telnet: connect to address ::1: Connection refused
Trying 127.0.0.1...
Connected to localhost.
Escape character is '^]'.
hello
OK

输入任意字符串,在之前的窗口都可以看到该字符串的回显

1
2014-06-30 17:43:58,943 (SinkRunner-PollingRunner-DefaultSinkProcessor) [INFO - org.apache.flume.sink.LoggerSink.process(LoggerSink.java:70)] Event: { headers:{} body: 68 65 6C 6C 6F 20 0D hello . }

##2. 用exec命令
cp flume-louz.conf flume-exec.conf,然后将flume-exec.conf中关于source定义的一段修改为:

1
2
3
# For each one of the sources, the type is defined
agent.sources.r1.type = exec
agent.sources.r1.command = tail -F /home/hduser/flume.log

运行

1
bin/flume-ng agent --conf conf -f conf/flume-exec.conf -n agent -Dflume.root.logger=INFO,console

然后新开一个命令行窗口,新建/home/hduser/flume.log文件,增加一行line1,保存,在flume-ng的运行窗口可以看到

1
2014-07-02 11:07:37,516 (SinkRunner-PollingRunner-DefaultSinkProcessor) [INFO - org.apache.flume.sink.LoggerSink.process(LoggerSink.java:70)] Event: { headers:{} body: 6C 69 6E 65 31 line1 }

##3. 结果写入HDFS
cp flume-exec.conf flume-hdfs.conf,然后将flume-hdfs.conf中关于sink定义的一段修改为:

1
2
3
4
5
6
7
agent.sinks.k1.type = hdfs
agent.sinks.k1.hdfs.path = hdfs://hadoop2:9000/flume/%y-%m-%d/%H%M
agent.sinks.k1.hdfs.round = true
agent.sinks.k1.hdfs.roundValue = 1 #每分钟生成一个文件
agent.sinks.k1.hdfs.roundUnit = minute
agent.sinks.k1.hdfs.useLocalTimeStamp = true #按时间频率生成文件的需要指定该属性,或者在source中有时间属性
agent.sinks.k1.hdfs.fileType = DataStream #默认为SequenceFile,指定为DataStream的话就是文本文件

运行

1
bin/flume-ng agent --conf conf -f conf/flume-hdfs.conf -n agent -Dflume.root.logger=INFO,console

然后新开一个命令行窗口,编辑/home/hduser/flume.log文件,增加文本,运行hdfs dfs -ls -R /flume可以看到类似的结果

1
2
3
4
5
6
7
8
9
10
11
12
[hduser@hadoop2 ~]$ hdfs dfs -ls -R /flume
drwxrwxrwx - hduser supergroup 0 2014-07-02 12:15 /flume/14-07-02
drwxrwxrwx - hduser supergroup 0 2014-07-02 12:08 /flume/14-07-02/1208
-rw-r--r-- 1 hduser supergroup 145 2014-07-02 12:08 /flume/14-07-02/1208/FlumeData.1404274103113
drwxrwxrwx - hduser supergroup 0 2014-07-02 12:10 /flume/14-07-02/1209
-rw-r--r-- 1 hduser supergroup 170 2014-07-02 12:10 /flume/14-07-02/1209/FlumeData.1404274186830
drwxrwxrwx - hduser supergroup 0 2014-07-02 12:10 /flume/14-07-02/1210
-rw-r--r-- 1 hduser supergroup 215 2014-07-02 12:10 /flume/14-07-02/1210/FlumeData.1404274204220
drwxrwxrwx - hduser supergroup 0 2014-07-02 12:15 /flume/14-07-02/1214
-rw-r--r-- 1 hduser supergroup 55 2014-07-02 12:15 /flume/14-07-02/1214/FlumeData.1404274468895
drwxrwxrwx - hduser supergroup 0 2014-07-02 12:15 /flume/14-07-02/1215
-rw-r--r-- 1 hduser supergroup 0 2014-07-02 12:15 /flume/14-07-02/1215/FlumeData.1404274501412.tmp

其中*.tmp的文件是当前正在写的文件,该例子中,当这分钟过去后,该后缀会去掉

##4. 写入HBase
首先新建一个测试用的表:

1
hbase(main):005:0> create 'flumeTest', 'cf'

再增加测试数据的文本文件,样例数据如下:

1
2
3
user1,tom,m,23
user2,jack,m,24
user3,kate,f,30

以下是flume的配置文件flume-hbase.conf

1
2
3
4
5
6
7
8
9
10
11
12
13
14
15
16
17
18
19
20
21
22
23
24
25
26
27
28
29
30
31
agent.sources = r1
agent.channels = c1
agent.sinks = k1
# For each one of the sources, the type is defined
agent.sources.r1.type = exec
agent.sources.r1.command = cat /home/hduser/flume_to_hbase.dat
# The channel can be defined as follows.
agent.sources.r1.channels = c1
# Each sink's type must be defined
agent.sinks.k1.type = hbase
agent.sinks.k1.table = flumeTest
agent.sinks.k1.columnFamily = cf
agent.sinks.k1.serializer = org.apache.flume.sink.hbase.RegexHbaseEventSerializer
agent.sinks.k1.serializer.colNames = ROW_KEY,name,gender,age #如果有字段会作为rowkey插入表中,则该字段名必须命名为ROW_KEY
agent.sinks.k1.serializer.regex = (.*),(.*),(.*),(.*) # 分组的正则表达式
agent.sinks.k1.serializer.rowKeyIndex = 0 #有字段作为rowkey时,需要指定所在位置
#Specify the channel the sink should use
agent.sinks.k1.channel = c1
# Each channel's type is defined.
agent.channels.c1.type = memory
# Other config values specific to each type of channel(sink or source)
# can be defined as well
# In this case, it specifies the capacity of the memory channel
agent.channels.c1.capacity = 1000
agent.channels.c1.transactionCapacity = 100

运行该flume-ng后,查看hbase中的表,可以看到数据已经插入到表中:

1
2
3
4
5
6
7
8
9
10
11
12
hbase(main):009:0> scan 'flumeTest'
ROW COLUMN+CELL
user1 column=cf:age, timestamp=1404362846923, value=23
user1 column=cf:gender, timestamp=1404362846923, value=m
user1 column=cf:name, timestamp=1404362846923, value=tom
user2 column=cf:age, timestamp=1404362846923, value=24
user2 column=cf:gender, timestamp=1404362846923, value=m
user2 column=cf:name, timestamp=1404362846923, value=jack
user3 column=cf:age, timestamp=1404362846923, value=30
user3 column=cf:gender, timestamp=1404362846923, value=f
user3 column=cf:name, timestamp=1404362846923, value=kate
3 row(s) in 2.0860 seconds

##5. 写分发
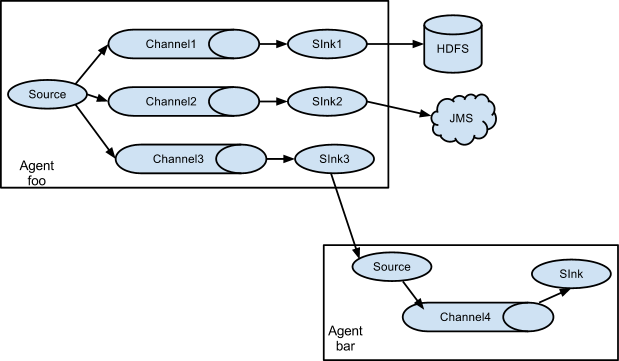
flume的写分发是通过多个channel进行的,如下图:
写分发示意图,因此可以按以下方式进行配置。cp flume-exec.conf flume-writeDispatch.conf,修改flume-writeDispatch.conf为:

1
2
3
4
5
6
7
8
9
10
11
12
13
14
15
16
17
18
19
20
21
22
23
24
25
26
27
28
29
30
31
32
33
agent.sources = r1
agent.channels = c1 c2 # 2个channel
agent.sinks = k1 k2 # 2个sinks
# For each one of the sources, the type is defined
agent.sources.r1.type = exec
agent.sources.r1.command = tail -F /home/hduser/flume.log
# The channel can be defined as follows.
agent.sources.r1.channels = c1 c2
# Each sink's type must be defined
agent.sinks.k1.type = logger
agent.sinks.k2.type = hdfs
agent.sinks.k2.hdfs.path = hdfs://hadoop2:9000/flume/writeDispatch.txt
agent.sinks.k2.hdfs.fileType = DataStream
agent.sinks.k2.hdfs.rollInterval = 0 # 设置成不滚动
agent.sinks.k2.hdfs.rollSize = 0
agent.sinks.k2.hdfs.rollCount = 0
#Specify the channel the sink should use
agent.sinks.k1.channel = c1
agent.sinks.k2.channel = c2
# Each channel's type is defined.
agent.channels.c1.type = memory
agent.channels.c1.capacity = 1000
agent.channels.c1.transactionCapacity = 100
agent.channels.c2.type = memory
agent.channels.c2.capacity = 1000
agent.channels.c2.transactionCapacity = 100

运行flume-ng,编辑/home/hduser/flume.log文件,可以看到命令行窗口和hdfs里都有信息输出

##6. 读汇总
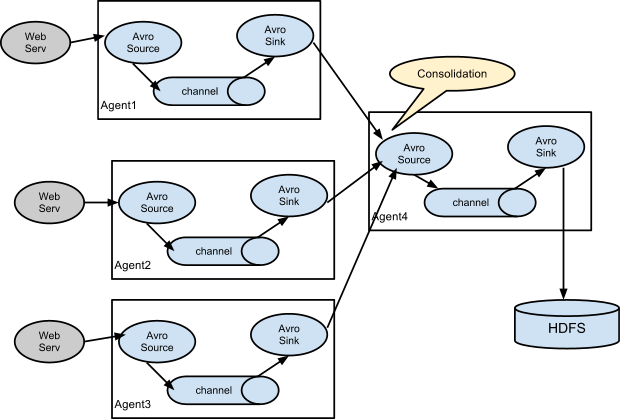
flume的读汇总是通过多个agent的sink指向同一个agent的source实现,架构如下图
读汇总,样例配置如下:

flume-collector.conf 收集器agent配置

1
2
3
4
5
6
7
8
9
10
11
12
13
14
15
16
17
18
19
20
21
22
23
24
25
26
agent.sources = r1
agent.channels = c1
agent.sinks = k1
# For each one of the sources, the type is defined
agent.sources.r1.type = avro
agent.sources.r1.bind = localhost # 监听60000端口
agent.sources.r1.port = 60000
# The channel can be defined as follows.
agent.sources.r1.channels = c1
# Each sink's type must be defined
agent.sinks.k1.type = logger
#Specify the channel the sink should use
agent.sinks.k1.channel = c1
# Each channel's type is defined.
agent.channels.c1.type = memory
# Other config values specific to each type of channel(sink or source)
# can be defined as well
# In this case, it specifies the capacity of the memory channel
agent.channels.c1.capacity = 1000
agent.channels.c1.transactionCapacity = 100

flume-src1.conf

1
2
3
4
5
6
7
8
9
10
11
12
13
14
15
16
17
18
19
20
21
22
23
24
25
26
27
28
agent1.sources = r1
agent1.channels = c1
agent1.sinks = k1
# For each one of the sources, the type is defined
agent1.sources.r1.type = netcat
agent1.sources.r1.bind = localhost
agent1.sources.r1.port = 44444
# The channel can be defined as follows.
agent1.sources.r1.channels = c1
# Each sink's type must be defined
agent1.sinks.k1.type = avro
agent1.sinks.k1.hostname = localhost #sink指向收集agent的端口
agent1.sinks.k1.port = 60000
#Specify the channel the sink should use
agent1.sinks.k1.channel = c1
# Each channel's type is defined.
agent1.channels.c1.type = memory
# Other config values specific to each type of channel(sink or source)
# can be defined as well
# In this case, it specifies the capacity of the memory channel
agent1.channels.c1.capacity = 1000
agent1.channels.c1.transactionCapacity = 100

flume-src2.conf

1
2
3
4
5
6
7
8
9
10
11
12
13
14
15
16
17
18
19
20
21
22
23
24
25
26
27
28
agent2.sources = r1
agent2.channels = c1
agent2.sinks = k1
# For each one of the sources, the type is defined
agent2.sources.r1.type = netcat
agent2.sources.r1.bind = localhost
agent2.sources.r1.port = 55555
# The channel can be defined as follows.
agent2.sources.r1.channels = c1
# Each sink's type must be defined
agent2.sinks.k1.type = avro
agent2.sinks.k1.hostname = localhost #sink指向收集agent的端口
agent2.sinks.k1.port = 60000
#Specify the channel the sink should use
agent2.sinks.k1.channel = c1
# Each channel's type is defined.
agent2.channels.c1.type = memory
# Other config values specific to each type of channel(sink or source)
# can be defined as well
# In this case, it specifies the capacity of the memory channel
agent2.channels.c1.capacity = 1000
agent2.channels.c1.transactionCapacity = 100

打开3个窗口,分别使用上述的配置文件运行flume-ng,再新开两个窗口,分别telnet localhost的44444和55555端口,输入字符串,可以在运行flume-collector.conf的窗口看到类似的输出

1
2
3
4
5
6
7
2014-07-03 07:23:44,858 (New I/O server boss #1 ([id: 0x15811815, /127.0.0.1:60000])) [INFO - org.apache.avro.ipc.NettyServer$NettyServerAvroHandler.handleUpstream(NettyServer.java:171)] [id: 0x178eeb69, /127.0.0.1:49206 => /127.0.0.1:60000] OPEN
2014-07-03 07:23:44,859 (New I/O worker #2) [INFO - org.apache.avro.ipc.NettyServer$NettyServerAvroHandler.handleUpstream(NettyServer.java:171)] [id: 0x178eeb69, /127.0.0.1:49206 => /127.0.0.1:60000] BOUND: /127.0.0.1:60000
2014-07-03 07:23:44,859 (New I/O worker #2) [INFO - org.apache.avro.ipc.NettyServer$NettyServerAvroHandler.handleUpstream(NettyServer.java:171)] [id: 0x178eeb69, /127.0.0.1:49206 => /127.0.0.1:60000] CONNECTED: /127.0.0.1:49206
2014-07-03 07:24:34,216 (SinkRunner-PollingRunner-DefaultSinkProcessor) [INFO - org.apache.flume.sink.LoggerSink.process(LoggerSink.java:70)] Event: { headers:{} body: 68 65 6C 6C 6F 2C 20 69 20 61 6D 20 75 73 65 72 hello, i am user }
2014-07-03 07:26:00,241 (SinkRunner-PollingRunner-DefaultSinkProcessor) [INFO - org.apache.flume.sink.LoggerSink.process(LoggerSink.java:70)] Event: { headers:{} body: 69 20 61 6D 20 75 73 65 72 31 20 6C 69 6E 65 31 i am user1 line1 }
2014-07-03 07:26:54,258 (SinkRunner-PollingRunner-DefaultSinkProcessor) [INFO - org.apache.flume.sink.LoggerSink.process(LoggerSink.java:70)] Event: { headers:{} body: 68 69 2C 20 69 20 61 6D 20 75 73 65 72 32 0D hi, i am user2. }
2014-07-03 07:27:24,271 (SinkRunner-PollingRunner-DefaultSinkProcessor) [INFO - org.apache.flume.sink.LoggerSink.process(LoggerSink.java:70)] Event: { headers:{} body: 62 79 65 20 75 73 65 72 32 0D bye user2. }
zookeeper场景使用

##服务器注册与状态监控
zookeeper有一种类型为EPHEMERAL的节点,这种节点的特点是当创建它的server(或者应用)终止的时候,它会自动删除,利用这个特性,我们可以利用zookeeper的getChildren方法,监控它的父节点的子节点列表的变化,进而做进一步处理。

服务器注册的样例代码如下:

1
2
3
4
5
6
7
8
9
10
11
12
13
14
15
16
17
18
19
20
21
22
23
24
25
26
27
28
29
30
31
32
33
34
35
36
37
38
39
40
package com.louz.zookeeper;
import java.io.IOException;
import org.apache.zookeeper.KeeperException;
import org.apache.zookeeper.ZooDefs.Ids;
import org.apache.zookeeper.CreateMode;
import org.apache.zookeeper.ZooKeeper;
public class ServerRegister {
/**
* @param args 该数组元素个数必须为1,用于表明注册的服务名称
* @throws InterruptedException
* @throws IOException
* @throws KeeperException
*/
public static void main(String[] args) throws InterruptedException, IOException, KeeperException {
if (args == null || args.length != 1) {
System.err.println("It must has one and only one arg");
System.exit(1);
}
ServerRegister s = new ServerRegister();
s.connectZookeeper(args[0]);
Thread.sleep(10000);
}
private void connectZookeeper(String serverName) throws IOException, KeeperException, InterruptedException {
ZooKeeper zk = new ZooKeeper("hadoop2:2181", 5000, null);
// /servers节点必须已经在zookeeper上存在
String createdPath = zk.create("/servers/" + serverName, serverName.getBytes(), Ids.OPEN_ACL_UNSAFE, CreateMode.EPHEMERAL);
System.out.println("Created Path: " + createdPath);
}
}

监听程序的代码,需要注意的是,由于zookeeper的监听都是只监听一次,所以在监控到变化之后,需要重新再注册一次监听器:

1
2
3
4
5
6
7
8
9
10
11
12
13
14
15
16
17
18
19
20
21
22
23
24
25
26
27
28
29
30
31
32
33
34
35
36
37
38
39
40
41
42
43
44
45
46
47
48
49
50
51
52
53
54
55
56
57
58
59
60
package com.louz.zookeeper;
import java.io.IOException;
import java.util.ArrayList;
import java.util.List;
import org.apache.zookeeper.KeeperException;
import org.apache.zookeeper.WatchedEvent;
import org.apache.zookeeper.Watcher;
import org.apache.zookeeper.ZooKeeper;
import org.apache.zookeeper.data.Stat;
public class ServerListener2 {
private static ZooKeeper zk;
private final static String monitorNode = "/servers";
/**
* @param args
* @throws IOException
* @throws InterruptedException
*/
public static void main(String[] args) throws IOException, InterruptedException {
zk = new ZooKeeper("hadoop2:2181", 5000, null);
updateServerList(); // 触发第一次监听
Thread.sleep(30000); // 延时30秒再结束进程,以便演示应用注册时,该监听进程的变化
}
protected static void updateServerList() {
List<String> serverList = new ArrayList<String>();
try {
List<String> children = zk.getChildren(monitorNode, new Watcher(){
@Override
public void process(WatchedEvent event) {
System.out.println(event.getPath());
updateServerList(); // 由于zookeeper的监听都是只监听一次,所以在监控到变化之后,需要重新再注册一次监听器
}
});
for (String subName : children) {
byte[] data = zk.getData(monitorNode + "/" + subName, false, new Stat());
serverList.add(new String(data));
}
System.out.println("Server list changed: " + serverList);
} catch (KeeperException e) {
// TODO Auto-generated catch block
e.printStackTrace();
} catch (InterruptedException e) {
// TODO Auto-generated catch block
e.printStackTrace();
}
}
}

演示:

  1. 先将ServerRegister打包成jar包,可通过Eclipse的Export->Runnable JAR file导出,我本地的名字为zookeeper-server-register.jar,留待后面使用
  2. 运行ServerListener2main函数,显示如下:

    1
    Server list changed: []
  3. 进入到zookeeper-server-register.jar所在目录,在命令行运行

    1
    2
    3
    4
    5
    6
    E:\tmp\zookeeper>java -jar zookeeper-server-register.jar server1
    SLF4J: Failed to load class "org.slf4j.impl.StaticLoggerBinder".
    SLF4J: Defaulting to no-operation (NOP) logger implementation
    SLF4J: See http://www.slf4j.org/codes.html#StaticLoggerBinder for further detail
    s.
    Created Path: /servers/server1

同时在ServerListener2的输出窗口可以看到:

1
2
3
Server list changed: []
/servers
Server list changed: [server1]

再新打开一个命令行窗口,运行

1
2
3
4
5
6
E:\tmp\zookeeper>java -jar zookeeper-server-register.jar server2
SLF4J: Failed to load class "org.slf4j.impl.StaticLoggerBinder".
SLF4J: Defaulting to no-operation (NOP) logger implementation
SLF4J: See http://www.slf4j.org/codes.html#StaticLoggerBinder for further detail
s.
Created Path: /servers/server2

同时在ServerListener2的输出窗口可以看到:

1
2
3
4
5
Server list changed: []
/servers
Server list changed: [server1]
/servers
Server list changed: [server1, server2]

ServerRegister的进程结束后,可以看到ServerListener2的输出窗口变化:

1
2
3
4
5
6
7
8
9
Server list changed: []
/servers
Server list changed: [server1]
/servers
Server list changed: [server1, server2]
/servers
Server list changed: [server2]
/servers
Server list changed: []

说明ServerListener2可以监听到/servers的子节点的变化