Flume是一个高可用的,分布式的海量日志采集、聚合和传输系统,Flume支持在日志系统中定制各类数据发送方,用于收集数据;同时,Flume提供对数据进行简单处理,并写到各种数据接受方(可定制)的能力
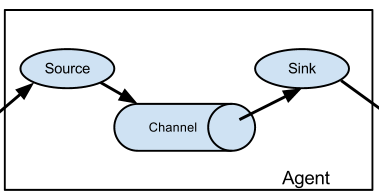
Flume的基本结构:agent = source(源)+ channel(类似缓存) + sink(目的)
每个agent由source、channel、sink组成,agent可以任意组合
Flume支持的源:Avro、Thrift、Exec、JMS、目录、NetCat、Syslog、Http、自定义source
Flume支持的sink:HDFS、控制台输出、Avro、Thrift、IRC、本地文件、HBase、Apache Solr、自定义输出
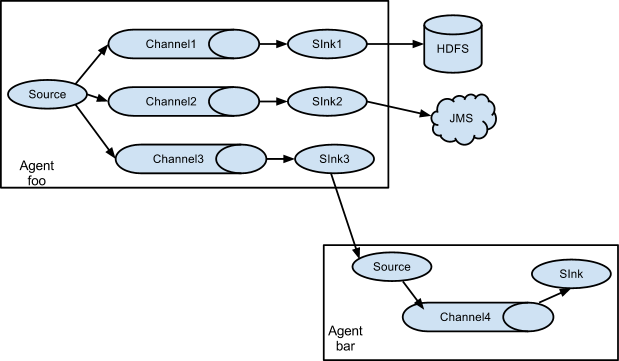
Flume支持的channel类型:内存、数据库(目前仅支持Derby)、本地文件、自定义channel
##1. 一个简单例子conf目录新建flume-louz.conf 文件,内容如下:1
2
3
4
5
6
7
8
9
10
11
12
13
14
15
16
17
18
19
20
21
22
23
24
25
26
agent.sources = r1
agent.channels = c1
agent.sinks = k1
# For each one of the sources, the type is defined
agent.sources.r1.type = netcat
agent.sources.r1.bind = localhost
agent.sources.r1.port = 44444
# The channel can be defined as follows.
agent.sources.r1.channels = c1
# Each sink's type must be defined
agent.sinks.k1.type = logger
#Specify the channel the sink should use
agent.sinks.k1.channel = c1
# Each channel's type is defined.
agent.channels.c1.type = memory
# Other config values specific to each type of channel(sink or source)
# can be defined as well
# In this case, it specifies the capacity of the memory channel
agent.channels.c1.capacity = 1000
agent.channels.c1.transactionCapacity = 100
配置完后,运行1
bin/flume-ng agent --conf conf -f conf/flume-louz.conf -n agent -Dflume.root.logger=INFO,console
然后打开另一个控制台,输入命令telnet localhost 44444,得到如下输出1
2
3
4
5
6
7
8
[hduser@hadoop2 conf]$ telnet localhost 44444
Trying ::1...
telnet: connect to address ::1: Connection refused
Trying 127.0.0.1...
Connected to localhost.
Escape character is '^]'.
hello
OK
输入任意字符串,在之前的窗口都可以看到该字符串的回显1
2014-06-30 17:43:58,943 (SinkRunner-PollingRunner-DefaultSinkProcessor) [INFO - org.apache.flume.sink.LoggerSink.process(LoggerSink.java:70)] Event: { headers:{} body: 68 65 6C 6C 6F 20 0D hello . }
##2. 用exec命令cp flume-louz.conf flume-exec.conf,然后将flume-exec.conf 中关于source定义的一段修改为:1
2
3
# For each one of the sources, the type is defined
agent.sources.r1.type = exec
agent.sources.r1.command = tail -F /home/hduser/flume.log
运行1
bin/flume-ng agent --conf conf -f conf/flume-exec.conf -n agent -Dflume.root.logger=INFO,console
然后新开一个命令行窗口,新建/home/hduser/flume.log文件,增加一行line1,保存,在flume-ng的运行窗口可以看到1
2014-07-02 11:07:37,516 (SinkRunner-PollingRunner-DefaultSinkProcessor) [INFO - org.apache.flume.sink.LoggerSink.process(LoggerSink.java:70)] Event: { headers:{} body: 6C 69 6E 65 31 line1 }
##3. 结果写入HDFScp flume-exec.conf flume-hdfs.conf,然后将flume-hdfs.conf 中关于sink定义的一段修改为:1
2
3
4
5
6
7
agent.sinks.k1.type = hdfs
agent.sinks.k1.hdfs.path = hdfs://hadoop2:9000/flume/%y-%m-%d/%H%M
agent.sinks.k1.hdfs.round = true
agent.sinks.k1.hdfs.roundValue = 1 #每分钟生成一个文件
agent.sinks.k1.hdfs.roundUnit = minute
agent.sinks.k1.hdfs.useLocalTimeStamp = true #按时间频率生成文件的需要指定该属性,或者在source中有时间属性
agent.sinks.k1.hdfs.fileType = DataStream #默认为SequenceFile,指定为DataStream的话就是文本文件
运行1
bin/flume-ng agent --conf conf -f conf/flume-hdfs.conf -n agent -Dflume.root.logger=INFO,console
然后新开一个命令行窗口,编辑/home/hduser/flume.log文件,增加文本,运行hdfs dfs -ls -R /flume可以看到类似的结果1
2
3
4
5
6
7
8
9
10
11
12
[hduser@hadoop2 ~]$ hdfs dfs -ls -R /flume
drwxrwxrwx - hduser supergroup 0 2014-07-02 12:15 /flume/14-07-02
drwxrwxrwx - hduser supergroup 0 2014-07-02 12:08 /flume/14-07-02/1208
-rw-r--r-- 1 hduser supergroup 145 2014-07-02 12:08 /flume/14-07-02/1208/FlumeData.1404274103113
drwxrwxrwx - hduser supergroup 0 2014-07-02 12:10 /flume/14-07-02/1209
-rw-r--r-- 1 hduser supergroup 170 2014-07-02 12:10 /flume/14-07-02/1209/FlumeData.1404274186830
drwxrwxrwx - hduser supergroup 0 2014-07-02 12:10 /flume/14-07-02/1210
-rw-r--r-- 1 hduser supergroup 215 2014-07-02 12:10 /flume/14-07-02/1210/FlumeData.1404274204220
drwxrwxrwx - hduser supergroup 0 2014-07-02 12:15 /flume/14-07-02/1214
-rw-r--r-- 1 hduser supergroup 55 2014-07-02 12:15 /flume/14-07-02/1214/FlumeData.1404274468895
drwxrwxrwx - hduser supergroup 0 2014-07-02 12:15 /flume/14-07-02/1215
-rw-r--r-- 1 hduser supergroup 0 2014-07-02 12:15 /flume/14-07-02/1215/FlumeData.1404274501412.tmp
其中*.tmp的文件是当前正在写的文件,该例子中,当这分钟过去后,该后缀会去掉
##4. 写入HBase1
hbase(main):005:0> create 'flumeTest', 'cf'
再增加测试数据的文本文件,样例数据如下:1
2
3
user1,tom,m,23
user2,jack,m,24
user3,kate,f,30
以下是flume的配置文件flume-hbase.conf 1
2
3
4
5
6
7
8
9
10
11
12
13
14
15
16
17
18
19
20
21
22
23
24
25
26
27
28
29
30
31
agent.sources = r1
agent.channels = c1
agent.sinks = k1
# For each one of the sources, the type is defined
agent.sources.r1.type = exec
agent.sources.r1.command = cat /home/hduser/flume_to_hbase.dat
# The channel can be defined as follows.
agent.sources.r1.channels = c1
# Each sink's type must be defined
agent.sinks.k1.type = hbase
agent.sinks.k1.table = flumeTest
agent.sinks.k1.columnFamily = cf
agent.sinks.k1.serializer = org.apache.flume.sink.hbase.RegexHbaseEventSerializer
agent.sinks.k1.serializer.colNames = ROW_KEY,name,gender,age #如果有字段会作为rowkey插入表中,则该字段名必须命名为ROW_KEY
agent.sinks.k1.serializer.regex = (.*),(.*),(.*),(.*) # 分组的正则表达式
agent.sinks.k1.serializer.rowKeyIndex = 0 #有字段作为rowkey时,需要指定所在位置
#Specify the channel the sink should use
agent.sinks.k1.channel = c1
# Each channel's type is defined.
agent.channels.c1.type = memory
# Other config values specific to each type of channel(sink or source)
# can be defined as well
# In this case, it specifies the capacity of the memory channel
agent.channels.c1.capacity = 1000
agent.channels.c1.transactionCapacity = 100
运行该flume-ng后,查看hbase中的表,可以看到数据已经插入到表中:1
2
3
4
5
6
7
8
9
10
11
12
hbase(main):009:0> scan 'flumeTest'
ROW COLUMN+CELL
user1 column=cf:age, timestamp=1404362846923, value=23
user1 column=cf:gender, timestamp=1404362846923, value=m
user1 column=cf:name, timestamp=1404362846923, value=tom
user2 column=cf:age, timestamp=1404362846923, value=24
user2 column=cf:gender, timestamp=1404362846923, value=m
user2 column=cf:name, timestamp=1404362846923, value=jack
user3 column=cf:age, timestamp=1404362846923, value=30
user3 column=cf:gender, timestamp=1404362846923, value=f
user3 column=cf:name, timestamp=1404362846923, value=kate
3 row(s) in 2.0860 seconds
##5. 写分发cp flume-exec.conf flume-writeDispatch.conf,修改flume-writeDispatch.conf 为:1
2
3
4
5
6
7
8
9
10
11
12
13
14
15
16
17
18
19
20
21
22
23
24
25
26
27
28
29
30
31
32
33
agent.sources = r1
agent.channels = c1 c2 # 2个channel
agent.sinks = k1 k2 # 2个sinks
# For each one of the sources, the type is defined
agent.sources.r1.type = exec
agent.sources.r1.command = tail -F /home/hduser/flume.log
# The channel can be defined as follows.
agent.sources.r1.channels = c1 c2
# Each sink's type must be defined
agent.sinks.k1.type = logger
agent.sinks.k2.type = hdfs
agent.sinks.k2.hdfs.path = hdfs://hadoop2:9000/flume/writeDispatch.txt
agent.sinks.k2.hdfs.fileType = DataStream
agent.sinks.k2.hdfs.rollInterval = 0 # 设置成不滚动
agent.sinks.k2.hdfs.rollSize = 0
agent.sinks.k2.hdfs.rollCount = 0
#Specify the channel the sink should use
agent.sinks.k1.channel = c1
agent.sinks.k2.channel = c2
# Each channel's type is defined.
agent.channels.c1.type = memory
agent.channels.c1.capacity = 1000
agent.channels.c1.transactionCapacity = 100
agent.channels.c2.type = memory
agent.channels.c2.capacity = 1000
agent.channels.c2.transactionCapacity = 100
运行flume-ng,编辑/home/hduser/flume.log文件,可以看到命令行窗口和hdfs里都有信息输出
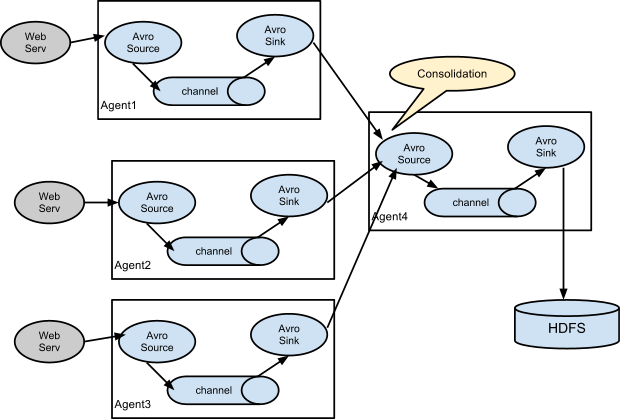
##6. 读汇总
flume-collector.conf 收集器agent配置1
2
3
4
5
6
7
8
9
10
11
12
13
14
15
16
17
18
19
20
21
22
23
24
25
26
agent.sources = r1
agent.channels = c1
agent.sinks = k1
# For each one of the sources, the type is defined
agent.sources.r1.type = avro
agent.sources.r1.bind = localhost # 监听60000端口
agent.sources.r1.port = 60000
# The channel can be defined as follows.
agent.sources.r1.channels = c1
# Each sink's type must be defined
agent.sinks.k1.type = logger
#Specify the channel the sink should use
agent.sinks.k1.channel = c1
# Each channel's type is defined.
agent.channels.c1.type = memory
# Other config values specific to each type of channel(sink or source)
# can be defined as well
# In this case, it specifies the capacity of the memory channel
agent.channels.c1.capacity = 1000
agent.channels.c1.transactionCapacity = 100
flume-src1.conf 1
2
3
4
5
6
7
8
9
10
11
12
13
14
15
16
17
18
19
20
21
22
23
24
25
26
27
28
agent1.sources = r1
agent1.channels = c1
agent1.sinks = k1
# For each one of the sources, the type is defined
agent1.sources.r1.type = netcat
agent1.sources.r1.bind = localhost
agent1.sources.r1.port = 44444
# The channel can be defined as follows.
agent1.sources.r1.channels = c1
# Each sink's type must be defined
agent1.sinks.k1.type = avro
agent1.sinks.k1.hostname = localhost #sink指向收集agent的端口
agent1.sinks.k1.port = 60000
#Specify the channel the sink should use
agent1.sinks.k1.channel = c1
# Each channel's type is defined.
agent1.channels.c1.type = memory
# Other config values specific to each type of channel(sink or source)
# can be defined as well
# In this case, it specifies the capacity of the memory channel
agent1.channels.c1.capacity = 1000
agent1.channels.c1.transactionCapacity = 100
flume-src2.conf 1
2
3
4
5
6
7
8
9
10
11
12
13
14
15
16
17
18
19
20
21
22
23
24
25
26
27
28
agent2.sources = r1
agent2.channels = c1
agent2.sinks = k1
# For each one of the sources, the type is defined
agent2.sources.r1.type = netcat
agent2.sources.r1.bind = localhost
agent2.sources.r1.port = 55555
# The channel can be defined as follows.
agent2.sources.r1.channels = c1
# Each sink's type must be defined
agent2.sinks.k1.type = avro
agent2.sinks.k1.hostname = localhost #sink指向收集agent的端口
agent2.sinks.k1.port = 60000
#Specify the channel the sink should use
agent2.sinks.k1.channel = c1
# Each channel's type is defined.
agent2.channels.c1.type = memory
# Other config values specific to each type of channel(sink or source)
# can be defined as well
# In this case, it specifies the capacity of the memory channel
agent2.channels.c1.capacity = 1000
agent2.channels.c1.transactionCapacity = 100
打开3个窗口,分别使用上述的配置文件运行flume-ng,再新开两个窗口,分别telnet localhost的44444和55555端口,输入字符串,可以在运行flume-collector.conf的窗口看到类似的输出1
2
3
4
5
6
7
2014-07-03 07:23:44,858 (New I/O server boss #1 ([id: 0x15811815, /127.0.0.1:60000])) [INFO - org.apache.avro.ipc.NettyServer$NettyServerAvroHandler.handleUpstream(NettyServer.java:171)] [id: 0x178eeb69, /127.0.0.1:49206 => /127.0.0.1:60000] OPEN
2014-07-03 07:23:44,859 (New I/O worker #2) [INFO - org.apache.avro.ipc.NettyServer$NettyServerAvroHandler.handleUpstream(NettyServer.java:171)] [id: 0x178eeb69, /127.0.0.1:49206 => /127.0.0.1:60000] BOUND: /127.0.0.1:60000
2014-07-03 07:23:44,859 (New I/O worker #2) [INFO - org.apache.avro.ipc.NettyServer$NettyServerAvroHandler.handleUpstream(NettyServer.java:171)] [id: 0x178eeb69, /127.0.0.1:49206 => /127.0.0.1:60000] CONNECTED: /127.0.0.1:49206
2014-07-03 07:24:34,216 (SinkRunner-PollingRunner-DefaultSinkProcessor) [INFO - org.apache.flume.sink.LoggerSink.process(LoggerSink.java:70)] Event: { headers:{} body: 68 65 6C 6C 6F 2C 20 69 20 61 6D 20 75 73 65 72 hello, i am user }
2014-07-03 07:26:00,241 (SinkRunner-PollingRunner-DefaultSinkProcessor) [INFO - org.apache.flume.sink.LoggerSink.process(LoggerSink.java:70)] Event: { headers:{} body: 69 20 61 6D 20 75 73 65 72 31 20 6C 69 6E 65 31 i am user1 line1 }
2014-07-03 07:26:54,258 (SinkRunner-PollingRunner-DefaultSinkProcessor) [INFO - org.apache.flume.sink.LoggerSink.process(LoggerSink.java:70)] Event: { headers:{} body: 68 69 2C 20 69 20 61 6D 20 75 73 65 72 32 0D hi, i am user2. }
2014-07-03 07:27:24,271 (SinkRunner-PollingRunner-DefaultSinkProcessor) [INFO - org.apache.flume.sink.LoggerSink.process(LoggerSink.java:70)] Event: { headers:{} body: 62 79 65 20 75 73 65 72 32 0D bye user2. }
 ,因此可以按以下方式进行配置。
 ,样例配置如下: