Spark常见问题

Spark Streaming消费Kafka数据

首先考虑Spark Streaming消费Kafka数据时,如何保证数据不丢失

参考资料:Recent Evolution of Zero Data Loss Guarantee in Spark Streaming With Kafka
Improvements to Kafka integration of Spark Streaming

丢失的情况包括:

  1. Spark Streaming正在读取Kafka的数据,突然挂掉;
  2. Spark Streaming读取完Kafka的数据,在保存offset前(包括保存到Kafka的zookeeper或者某种持久化存储)挂掉。

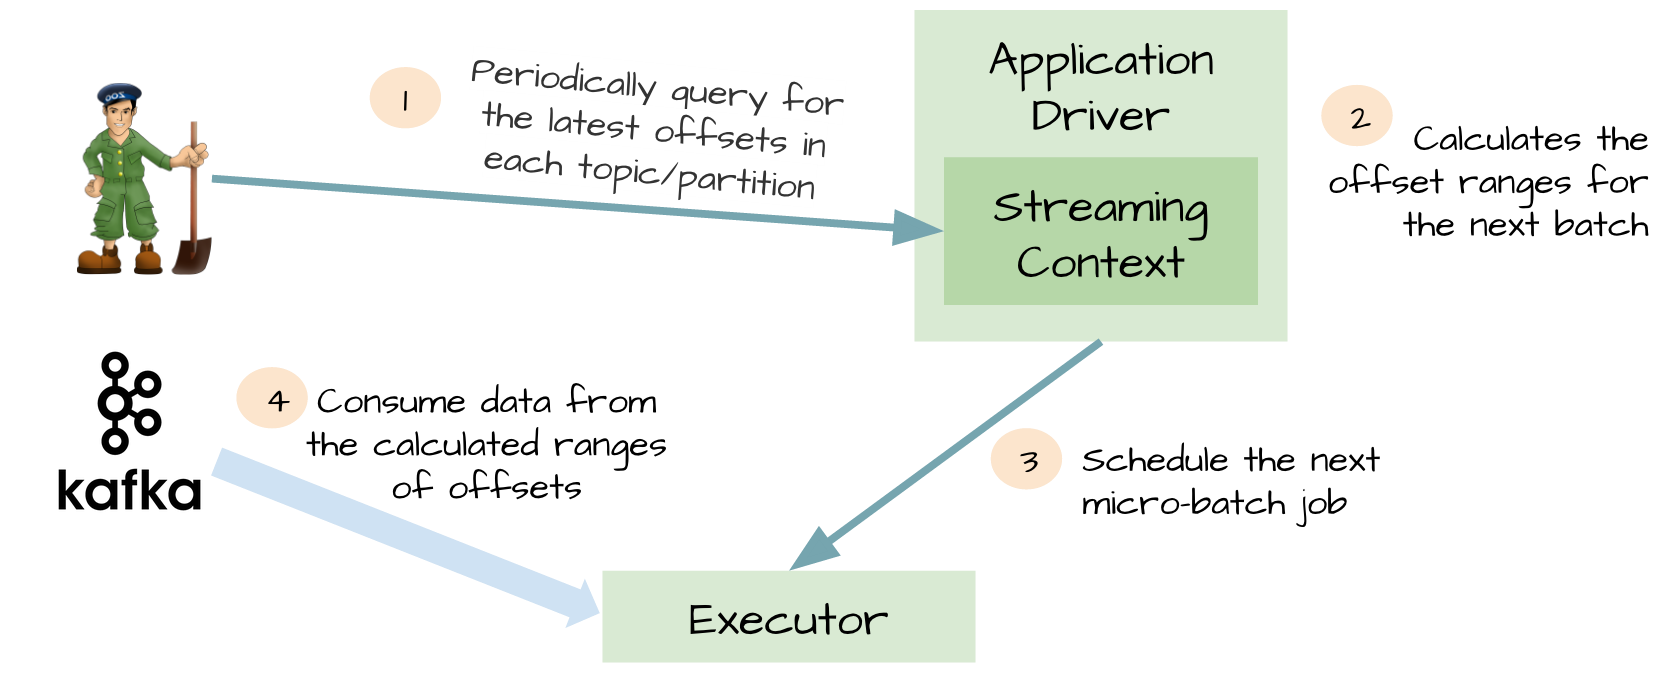
Spark Streaming从1.3以后提供2种方式消费Kafka数据,一种利用Receiver读取Kafka数据,生成DStream,然后供后续的task进行处理;另一种通过Driver计算每批次要消费的offset范围,由task的Executor通过Kafka简单API直接消费

问题:两种方式产生的DStream中的RDD进行partition的逻辑各是什么?第二种方式Executor的个数是否和Kafka主题的partition数目一致?

下面分别看看两种方式有哪些容错手段:
方式一:利用Receiver
代码如下:

1
2
3
4
5
import org.apache.spark.streaming.kafka._
...
val kafkaStream = KafkaUtils.createStream(streamingContext,
[ZK quorum], [consumer group id], [per-topic number of Kafka partitions to consume])

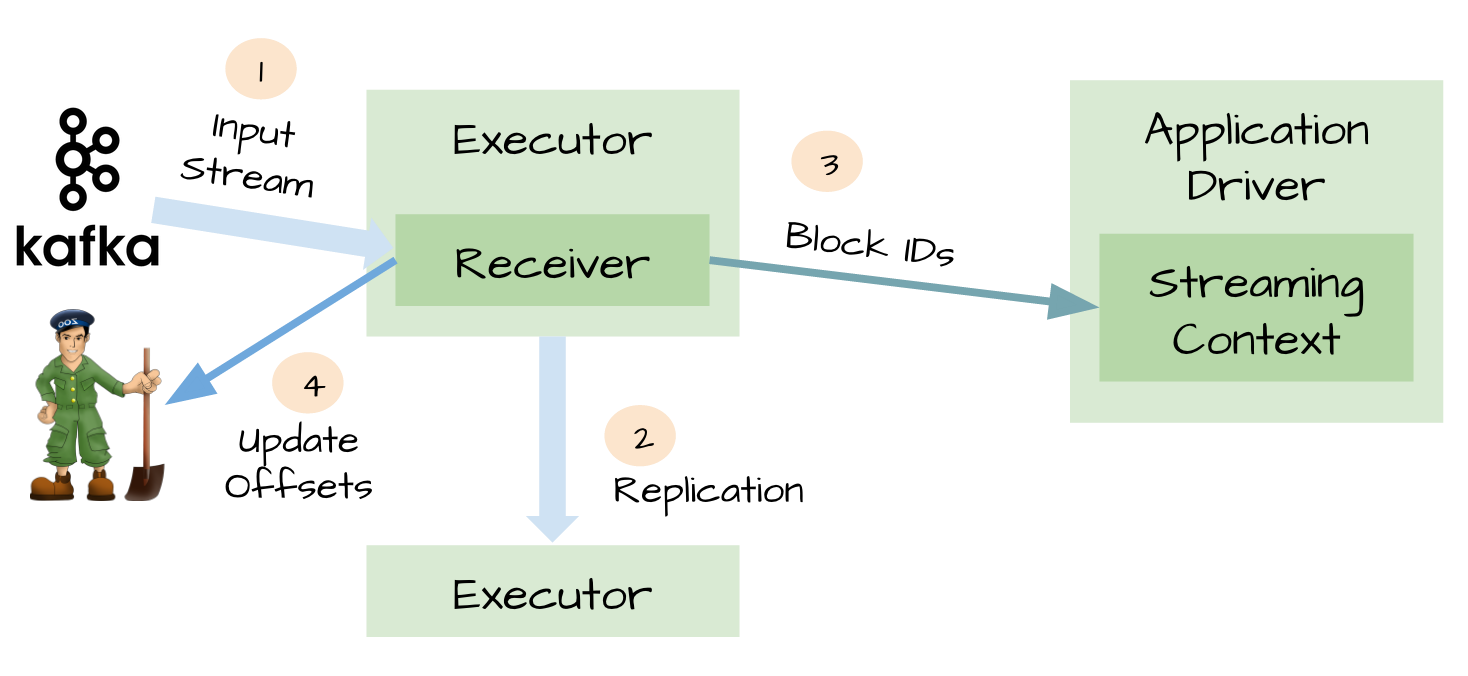
首先,保证Receiver的可靠性:
图1. 利用Receiver消费Kafka数据

  1. 首先Receiver从Kafka读取数据
  2. 得到一段数据,生成RDD(?)之后,数据复制到2个Executor
  3. 告知Driver该段Block的所有ID
  4. 更新Zookeeper中的offset信息

Receiver挂掉重启后,可根据Zookeeper中的offset信息继续读取Kafka消息

其次,保证Driver的可靠性:
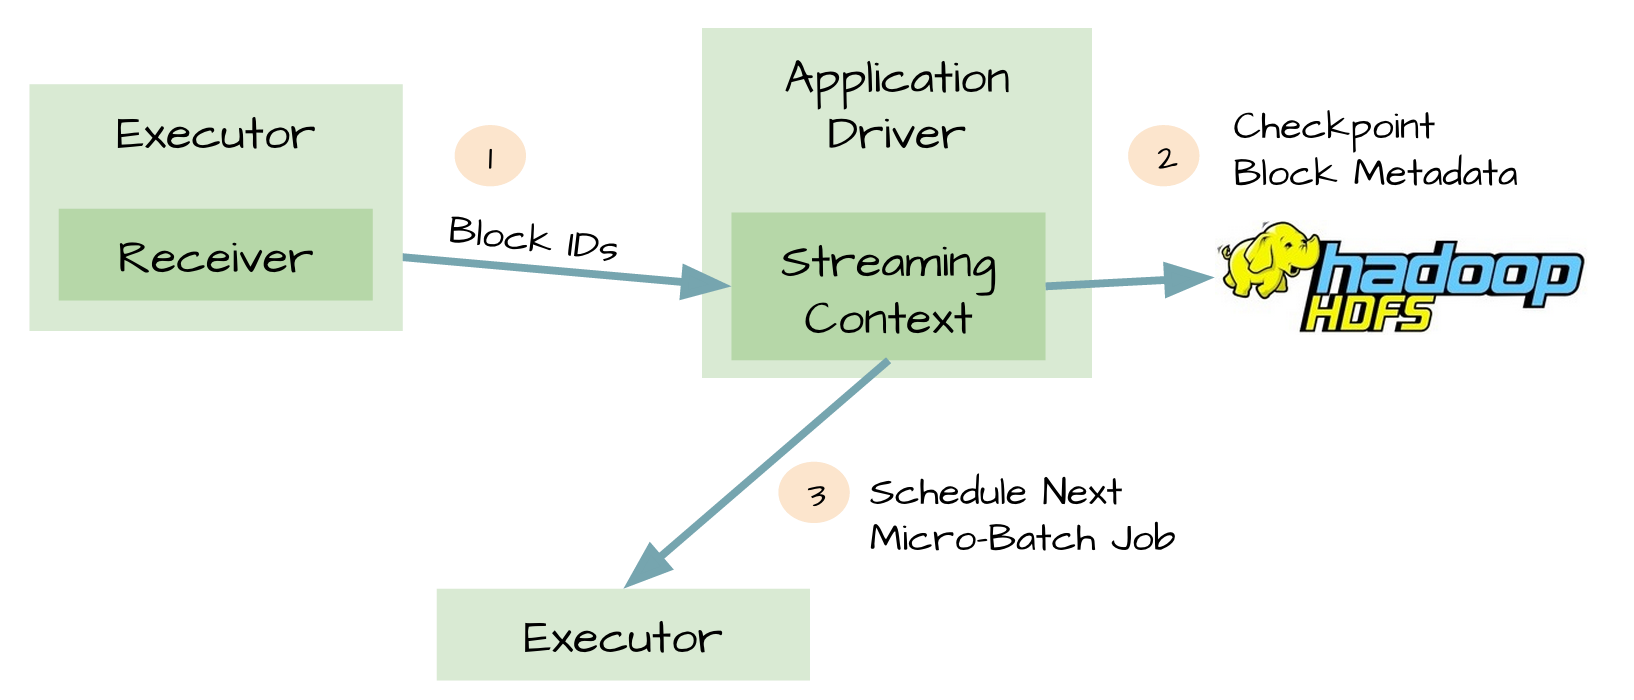
图1. Driver开启checkpoint

开启checkpoint机制后,driver会把以下信息保存到HDFS等可靠存储上:

  1. 配置信息
  2. 代码
  3. 一些排队等待处理但没有完成的RDD(仅仅是metadata,而不是data)

这样,在Driver挂掉重启后,能根据以上信息重新构造Driver继续运行

但即使做了上述的2项设置,仍然存在丢失数据的可能,主要是以下的场景:
回到图1的场景下

  1. 在第2步,数据正确复制到2个Executor,并缓存在它们的内存中;
  2. Receiver告知Kafka消息已消费(更新了ZK中的offset)
  3. Executor开始处理缓存在内存中的数据
  4. 这时,Driver挂了
  5. 由于Spark的机制,Driver挂了之后,由它启动的所有Executor都要kill掉
  6. 在处理数据的Executor进程被kill掉,缓存的内存自然也没有了,但由于Receiver认为这些数据已经消费了,因此这部分数据无法再恢复。

于是,从Spark1.2开始引入一个WAL(Write ahead log)的东东,简单来说就是在Receiver把数据复制到Executor前,先写到可靠存储上,如图:
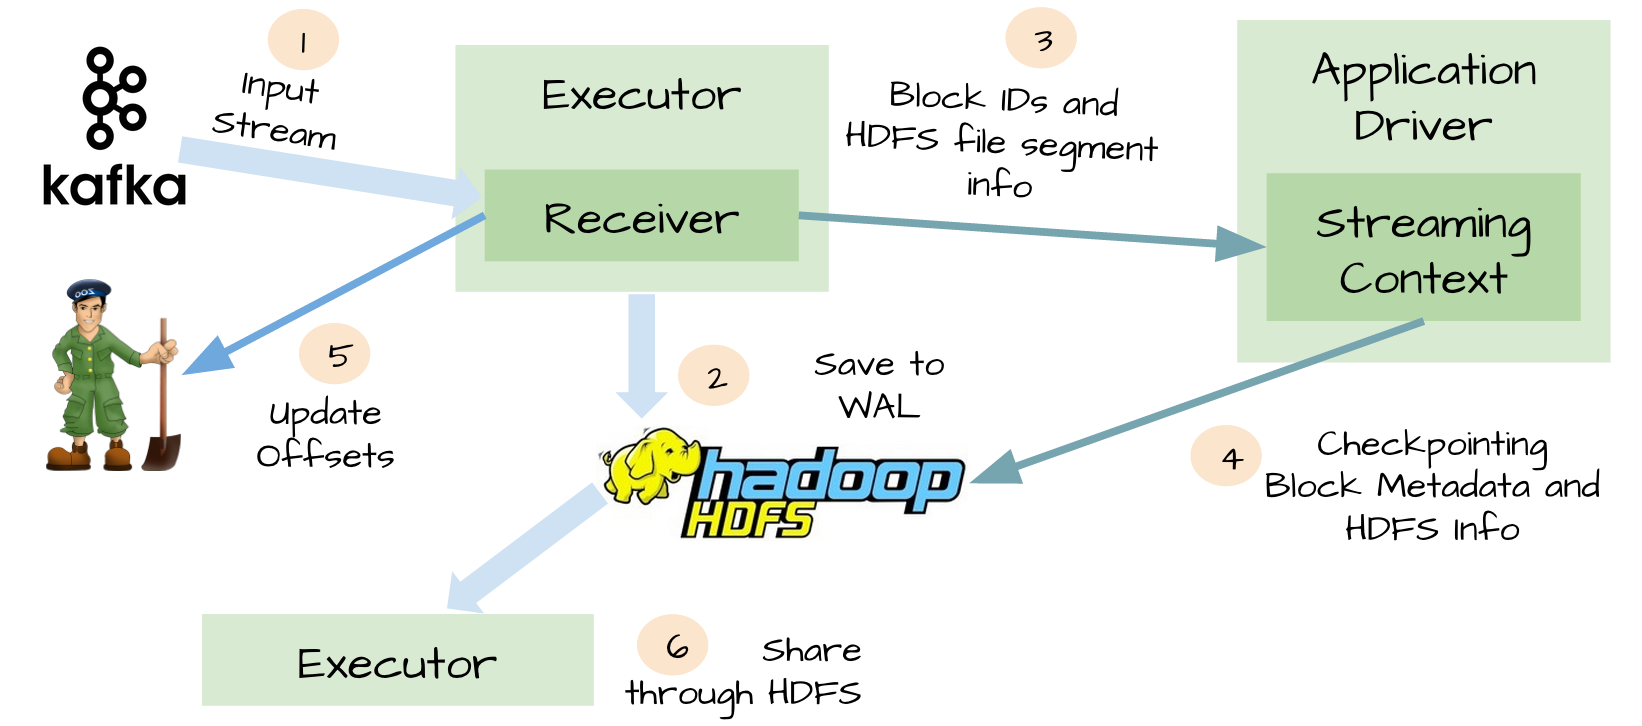
图3. 加上WAL的完整处理逻辑

自此,再也不用担心数据会丢失了。

方式二:Direct Stream
图4. 使用Direct Stream

  1. 一开始Driver负责从ZK查询每个topic/partition的最新offset
  2. 计算下个batch的offset范围
  3. 将offset范围交给Executor
  4. Executor利用Kafka的SimpleConsumer API访问Kafka,消费消息
  5. Executor计算成功后通知Driver,Driver会将offset信息保存到checkpoint中

Exactly-once Spark Streaming from Apache Kafka——对内部实现说得比较清楚

BUT,如果要保证数据要且只能消费一次呢?

设想一下如果在Receiver更新ZK之前挂掉了,如下图:
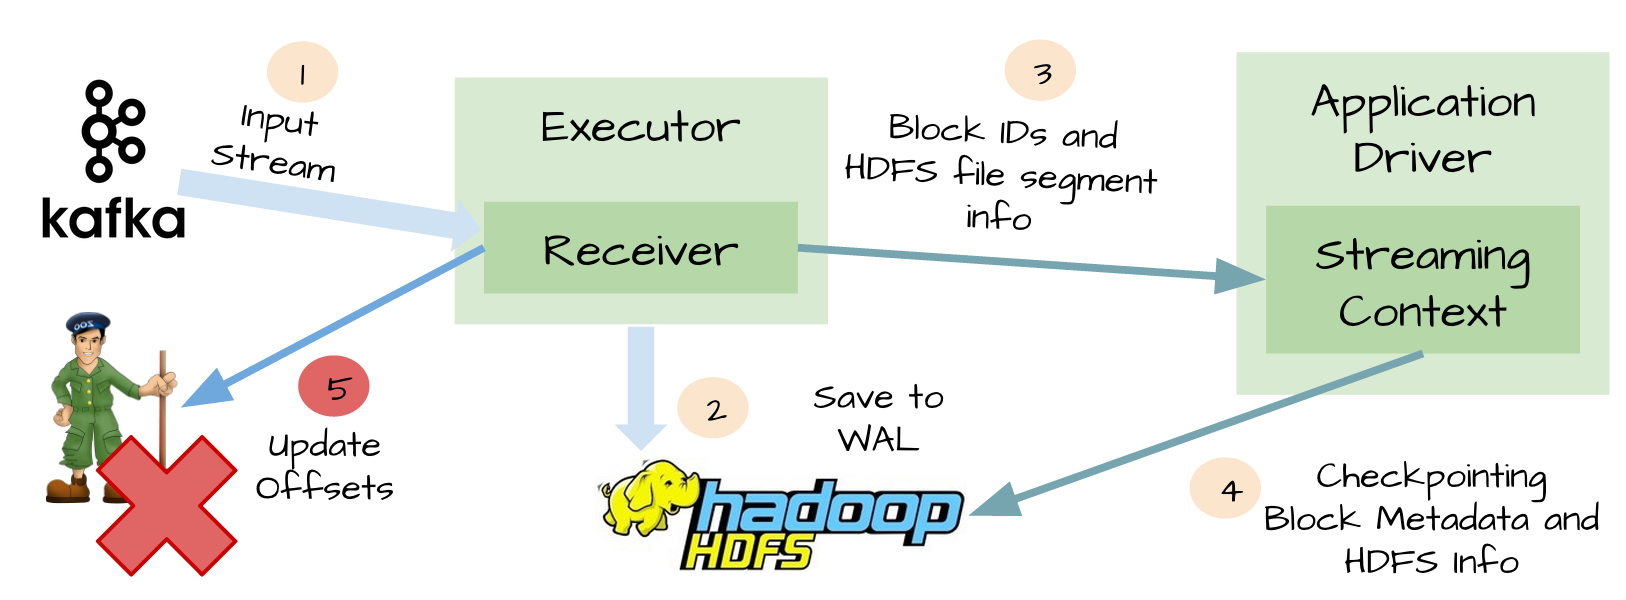
图5. Receiver更新ZK之前挂掉的情况

  1. Kafka的消息已经成功通过WAL写进HDFS
  2. Spark Streaming也已经成功处理完这些数据
  3. Receiver更新ZK的offset之前挂掉!
  4. Receiver重启恢复,从WAL中恢复上次消费的数据
  5. 继续消费Kafka消息,但由于Receiver使用的是Kafka的高级API,会根据ZK中记录的已消费的offset往后继续消费,因此有部分消息会重复消费计算

最后考虑性能

WAL有2个缺点:

  1. 由于从Receiver取到的数据要先持久化,因此会降低消费的吞吐量(一个解决办法就是增加Receiver),代码如下:

    1
    2
    3
    4
    5
    val kafkaParams: Map[String, String] = Map("group.id" -> "terran", /* ignore rest */)
    val numStreams = 5
    val kafkaStreams = (1 to numStreams).map { i => KafkaUtils.createStream(..., kafkaParams) }
    val unifiedStream = streamingContext.union(kafkaStreams)
    unifiedStream.print()
  2. 增加存储空间:同一份数据在Kafka有一份,在HDFS也有一份

参考资料1
参考资料2

  1. 创建多个Input DStreams
    1
    2
    3
    4
    5
    val kafkaParams: Map[String, String] = Map("group.id" -> "terran", /* ignore rest */)
    val numStreams = 5
    val kafkaStreams = (1 to numStreams).map { i => KafkaUtils.createStream(..., kafkaParams) }
    val unifiedStream = streamingContext.union(kafkaStreams)
    unifiedStream.print()

按以上方式创建的5个Input DStream,都是Kafka消费组terran的成员,它们可以共同消费Kafka特定主题的消息,在KafkaUtils.createStream方法中,可以设置单个Input DStream的消费者线程数

  1. 读取方式
    http://group.jobbole.com/15559/

##
https://github.com/jacksu/utils4s/blob/master/spark-knowledge/md/spark_streaming%E4%BD%BF%E7%94%A8kafka%E4%BF%9D%E8%AF%81%E6%95%B0%E6%8D%AE%E9%9B%B6%E4%B8%A2%E5%A4%B1.md

RDD的partition

参考文档

Scala学习笔记

特质(trait)

特质(scala)和接口(java)的异同点:

相同点:

  1. scala中的特质类似java中的接口(没有任何具体方法的时候),某个类可以实现多个特质。

不同点:

  1. 特质可以有默认方法实现
  2. 子类实现特质用extends关键字;实现接口用implements
  3. 实现多个特质时,中间用with连接;实现多个接口时,中间用,分割

scala版本

ConsoleLogger.scala
1
2
3
class ConsoleLogger extends Logger with Cloneable with Serializable {
}

java版本

ConsoleLogger.java
1
2
3
class ConsoleLogger implements Logger,Cloneable,Serializable {
}

JDK 8是否也有类似?


构造不可修改数据类

不可修改的数据类有各种好处:

  1. 不用担心线程安全
  2. 方便定位问题
  3. 对象一旦被创建,就不用担心数据被错误修改

Java语言实现不可变数据类主要有2种方法:

  1. 只有构造函数和getter的类
  2. 使用Builder模式

方法1的主要问题在于:如果类的成员变量有多个(例如大于3个),而且不是必选的话,需要重载多个构造函数,在使用的时候容易造成混乱。

方法2主要可参见《Effective Java 2nd Edition》的第2条

1
2
3
4
5
6
7
8
9
10
11
12
13
14
15
16
17
18
19
20
21
22
23
24
25
26
27
28
29
30
31
32
33
34
35
36
37
38
39
40
41
42
43
44
45
46
47
48
49
50
51
52
53
54
55
56
57
58
59
60
61
62
63
64
65
66
67
68
69
70
public class ImmutableObject {
private final int a; // required
private final int b; // required
private final int c; // optional
private final int d; // optional
private final int e; // optional
private ImmutableObject(Builder builder) {
this.a = builder.a;
this.b = builder.b;
this.c = builder.c;
this.d = builder.d;
this.e = builder.e;
}
@Override
public String toString() {
return "ImmutableObject{" +
"a=" + a +
", b=" + b +
", c=" + c +
", d=" + d +
", e=" + e +
'}';
}
public static class Builder {
private final int a;
private final int b;
// 可以设置默认值
private int c = 1;
private int d = 2;
private int e = 3;
public Builder(int a, int b) {
this.a = a;
this.b = b;
}
public Builder c(int c) {
this.c = c;
return this;
}
public Builder d(int d) {
this.d = d;
return this;
}
public Builder e(int e) {
this.e = e;
return this;
}
public ImmutableObject build() {
return new ImmutableObject(this);
}
}
public static void main(String[] args) {
ImmutableObject obj = new Builder(10, 20)
.c(30)
.d(40)
.build();
System.out.println(obj);
}
}

输出结果为:

1
ImmutableObject{a=10, b=20, c=30, d=40, e=3}

scala语言实现有3种方案

  1. Immutable Classes
  2. Case Classes
  3. Tuples

Immutable Class:将类的主构造函数中的参数都设为val,还可以设置参数的默认值

1
2
3
4
5
6
7
8
9
10
11
12
13
14
15
16
17
18
19
20
21
22
class ImmutableScalaClass(
val a:Int,
val b:Int,
val c:Int = 1,
val d:Int = 2,
val e:Int = 3) {
override def toString = s"ImmutableScalaClass(a=$a, b=$b, c=$c, d=$d, e=$e)"
}
object ImmutableScalaObject {
def main(args: Array[String]): Unit = {
val obj = new ImmutableScalaClass(
a = 10,
b = 20,
c = 30,
d = 40
)
print(obj)
}
}

输出:

1
ImmutableScalaClass(a=10, b=20, c=30, d=40, e=3)

可以看出,scala的语法比java的Builder模式要清晰和直观很多

Case Classes: 将类设为case class

1
2
3
4
5
6
7
8
9
10
11
12
13
14
15
16
17
18
19
case class CaseScalaClass(
val a: Int,
val b: Int,
val c: Int = 1,
val d: Int = 2,
val e: Int = 3)
object CaseScalaObject {
def main(args: Array[String]): Unit = {
val obj = new CaseScalaClass(
a = 10,
b = 20,
c = 30,
d = 40
)
print(obj)
}
}

输出:

1
CaseScalaClass(10,20,30,40,3)

由于case class默认实现了toStringequalshashCode等方法,所以写法更简洁

Tuples

1
2
3
4
5
6
7
object TupleDemo {
def main(args: Array[String]): Unit = {
val t = (1, 2, 3, 4, 5)
print(t._1, t._2, t._3, t._4, t._5)
}
}

输出:

1
(1,2,3,4,5)

可以看出,Tuple不用创建新的类,使用简单,当然用途也很单一,单纯作为一个容器使用


主构造函数

函数与过程

函数:有返回值的方法,格式为:

1
2
3
def fuc(x: Int):Int = { // 有=号,返回值类型可以显示指定,不指定的话编译器也能推断出来(递归函数必须指定返回值类型)
......
}

过程:没有返回值(或者说返回值类型为Unit)的函数

1
2
3
4
5
6
7
8
9
def fuc(x: Int) { // 没有=号
......
}
或者
def fuc(x: Int):Unit = { // 有=号,但返回值类型为Unit
......
}

闭包

可以简单理解成:闭包就是用函数创建函数,创建时用到的参数或者外部变量,在结果函数中都会保存它们的引用

例子:scala实现

1
2
3
4
5
6
7
8
9
10
11
12
13
14
15
16
17
object ClosureFunctionDemo {
def makeClosureFunction(x: Int, func: Int => String) = {
i: Int => func(x * i)
}
def baseFunction(i: Int): String = {
"This is string: " + i
}
def main(args: Array[String]): Unit = {
// 调用makeClosureFunction时,可以理解成将100和baseFunction两个参数作为closureFunction的成员变量存放起来
val closureFunction = makeClosureFunction(100, baseFunction)
// 调用closureFunction(10)时,利用成员变量100和baseFunction以及入参10进行计算,返回结果
print(closureFunction(10))
}
}

java实现

1
2
3
4
5
6
7
8
9
10
11
12
13
14
15
16
17
18
19
20
21
22
23
24
25
26
27
28
29
30
31
32
33
34
35
36
37
38
39
40
public class JavaClosureFunction {
public static void main(String[] args) {
/* JDK 7 mode
BaseFunction baseFunction = new BaseFunction() {
@Override
public String call(int i) {
return "This is string: " + i;
}
};
*/
// JDK 8 mode
BaseFunction baseFunction = i -> "This is string: " + i;
ClosureFunction closureFunction = makeClosureFunction(100, baseFunction);
System.out.println(closureFunction.call(10));
}
private static ClosureFunction makeClosureFunction(int i, BaseFunction baseFunction) {
/* JDK 7 mode
return new ClosureFunction() {
@Override
public String call(int x) {
return baseFunction.call(x * i);
}
};
*/
// JDK 8 mode
return x -> baseFunction.call(x * i);
}
}
public interface BaseFunction {
String call(int i);
}
public interface ClosureFunction {
String call(int i);
}

Hexo Markdown语法效果

Hexo官方文档

引用(修改过)

Coffee. The finest organic suspension ever devised… I beat the Borg with it. - Captain Janeway
line 2

line 3
line 4


带标题代码

语法:

1
2
3
4
5
{% codeblock [lang:language] [标题] [链接] [链接文字] %}
代码块
{% endcodeblock %}

例子:

1
2
3
4
5
{% codeblock lang:java Title http://a.html A.java %}
public class A {
}
{% endcodeblock %}

效果:

TitleA.java
1
2
3
public class A {
}

Spring常见问题

如何配置定时任务

Spring 3中涉及定时任务的主要是TaskScheduler接口,利用spring的task命名空间,可以很简单地配置一个定时任务,以下是配置一个简单的定时任务(每隔5秒执行一次beanA.methodA方法)

1
2
3
4
5
6
7
8
9
<beans xmlns:task="http://www.springframework.org/schema/task"
......>
<task:scheduler id="myScheduler" pool-size="10"/>
<task:scheduled-tasks scheduler="myScheduler">
<task:scheduled ref="beanA" method="methodA" fixed-rate="5000"/>
</task:scheduled-tasks>
......
</beans>

如何使用spring4.x配置RESTFUL API

pom.xml

1
2
3
4
5
6
7
8
9
10
11
12
13
14
15
16
17
<dependencies>
<dependency>
<groupId>org.springframework</groupId>
<artifactId>spring-webmvc</artifactId>
<version>4.3.2.RELEASE</version>
</dependency>
<!--
jackson 2的包在classpath时,spring会使用该包进行json转换,详见spring官方文档的
“Enabling the MVC Java Config or the MVC XML Namespace”
-->
<dependency>
<groupId>com.fasterxml.jackson.core</groupId>
<artifactId>jackson-databind</artifactId>
<version>2.8.3</version>
</dependency>
</dependencies>

一个简单的Controller

1
2
3
4
5
6
7
8
9
10
11
12
13
14
15
16
17
18
19
20
21
22
23
24
25
26
@RestController
@RequestMapping("/users")
public class RestfulController {
/**
* 方式1
*
* @param id
* @return 返回一个ResponseEntity对象
*/
@RequestMapping(value="/type1/{id}", method = RequestMethod.GET)
public ResponseEntity<User> getUserById1(@PathVariable int id) {
return ResponseEntity.ok(new User(id, "type1 user"));
}
/**
* 方式2
*
* @param id
* @return 返回一个POJO
*/
@RequestMapping(value="/type2/{id}", method = RequestMethod.GET)
public User getUserById2(@PathVariable String id) {
return new User(1, "type2 user");
}
}

POJO对象

1
2
3
4
5
6
7
8
9
10
11
12
13
14
15
16
17
public class User {
private final int id;
private final String name;
public User(int id, String name) {
this.id = id;
this.name = name;
}
public int getId() {
return id;
}
public String getName() {
return name;
}
}

web.xml

1
2
3
4
5
6
7
8
9
10
11
12
13
14
15
16
17
18
19
20
21
22
<?xml version="1.0" encoding="UTF-8"?>
<web-app xmlns="http://java.sun.com/xml/ns/javaee"
xmlns:xsi="http://www.w3.org/2001/XMLSchema-instance"
xsi:schemaLocation="http://java.sun.com/xml/ns/javaee
http://java.sun.com/xml/ns/javaee/web-app_3_0.xsd"
version="3.0"
metadata-complete="true">
<servlet>
<servlet-name>springmvc</servlet-name>
<servlet-class>org.springframework.web.servlet.DispatcherServlet</servlet-class>
<init-param>
<param-name>contextConfigLocation</param-name>
<param-value>classpath:spring-mvc.xml</param-value>
</init-param>
<load-on-startup>1</load-on-startup>
</servlet>
<servlet-mapping>
<servlet-name>springmvc</servlet-name>
<url-pattern>/*</url-pattern>
</servlet-mapping>
</web-app>

spring-mvc.xml

1
2
3
4
5
6
7
8
9
10
11
12
13
14
15
16
<?xml version="1.0" encoding="UTF-8"?>
<beans xmlns="http://www.springframework.org/schema/beans"
xmlns:xsi="http://www.w3.org/2001/XMLSchema-instance"
xmlns:context="http://www.springframework.org/schema/context"
xmlns:mvc="http://www.springframework.org/schema/mvc"
xsi:schemaLocation="
http://www.springframework.org/schema/beans
http://www.springframework.org/schema/beans/spring-beans.xsd
http://www.springframework.org/schema/context
http://www.springframework.org/schema/context/spring-context.xsd
http://www.springframework.org/schema/mvc
http://www.springframework.org/schema/mvc/spring-mvc.xsd">
<context:component-scan base-package="io.jasonlu.springrestful.controller"/>
<mvc:annotation-driven/>
</beans>

测试覆盖率配置

Java的测试覆盖率工具可以使用CoberturaJacoco,以下主要介绍Cobertura的配置

基础配置

cobertura-maven-plugin的主页

1
2
3
4
5
6
7
8
9
<build>
<plugins>
<plugin>
<groupId>org.codehaus.mojo</groupId>
<artifactId>cobertura-maven-plugin</artifactId>
<version>2.7</version>
</plugin>
</plugins>
</build>

此时可以用mvn cobertura:cobertura命令产生测试覆盖率的报告,报告位置在target\site\cobertura\目录

在构建过程中校验

如果需要设置满足测试覆盖率达到某个阈值才能构建成功的话,需要做以下配置

1
2
3
4
5
6
7
8
9
10
11
12
13
14
15
16
17
18
19
20
21
22
23
24
25
26
27
28
29
30
31
32
33
34
35
36
<build>
<plugins>
<plugin>
<groupId>org.codehaus.mojo</groupId>
<artifactId>cobertura-maven-plugin</artifactId>
<version>2.7</version>
<configuration>
<check> <!-- required -->
<branchRate>85</branchRate> <!-- optional -->
<lineRate>85</lineRate> <!-- optional -->
<haltOnFailure>true</haltOnFailure> <!-- must be true,default is false -->
<totalBranchRate>85</totalBranchRate> <!-- optional -->
<totalLineRate>85</totalLineRate> <!-- optional -->
<packageLineRate>85</packageLineRate> <!-- optional -->
<packageBranchRate>85</packageBranchRate><!-- optional -->
<regexes>
<regex> <!-- 可针对某种匹配模式进行特殊设置 -->
<pattern>io.jasonlu.springrestful.*</pattern>
<branchRate>90</branchRate> <!-- optional -->
<lineRate>80</lineRate> <!-- required -->
</regex>
</regexes>
</check>
</configuration>
<executions>
<execution>
<phase>prepare-package</phase> <!-- default is verify -->
<goals>
<goal>clean</goal>
<goal>check</goal>
</goals>
</execution>
</executions>
</plugin>
</plugins>
</build>

执行mvn package时就会进行测试覆盖率的校验

Kafka常见问题

一、自定义Kafka开发镜像

目的

  1. 能快速启动
  2. 包含必要的功能

Dockerfile

1
2
3
4
5
6
7
8
9
FROM java:8-jre
MAINTAINER Louz
RUN curl -s http://apache.fayea.com/kafka/0.10.0.1/kafka_2.11-0.10.0.1.tgz | tar -xz -C /usr/local/
RUN cd /usr/local && ln -s kafka_2.11-0.10.0.1 kafka
WORKDIR /usr/local/kafka
CMD bin/zookeeper-server-start.sh config/zookeeper.properties &\
bin/kafka-server-start.sh config/server.properties

执行构建命令

1
docker build -f dockerfile -t louz/kafka0100 .

启动容器

1
2
# 将容器名指定为kafka,容器的hostname指定为kafka(方便后续程序访问)
docker run -d --name kafka -h kafka -p 9092:9092 louz/kafka0100

二、访问kakfa

创建topic

1
docker exec kafka bin/kafka-topics.sh --create --zookeeper localhost:2181 --replication-factor 1 --partitions 1 --topic test

启动consumer

1
docker exec kafka bin/kafka-console-consumer.sh --zookeeper localhost:2181 --topic test --from-beginning

启动producer发送消息

1
2
3
4
5
6
7
8
9
10
11
12
13
14
15
16
17
18
19
20
21
22
23
24
25
26
27
28
29
30
31
32
33
public class ProducerDemo {
private static KafkaProducer<String, String> procuder;
public static void main(String[] args) {
Producer<String, String> producer = getKafkaProducer();
String topic = "test";
for(int i = 0; i < 100; i++) {
ProducerRecord<String, String> record = new ProducerRecord<>(topic, "NO." + Integer.toString(i));
producer.send(record);
}
producer.close();
}
public static Producer<String, String> getKafkaProducer() {
if (procuder == null) {
Properties props = new Properties();
// 此处的hostname对应docker run中的-h参数,并且需要在hosts文件中做好ip映射
props.put("bootstrap.servers", "kafka:9092");
props.put("acks", "all");
props.put("retries", 0);
props.put("batch.size", 16384);
props.put("linger.ms", 1);
props.put("buffer.memory", 33554432);
props.put("key.serializer", "org.apache.kafka.common.serialization.StringSerializer");
props.put("value.serializer", "org.apache.kafka.common.serialization.StringSerializer");
procuder = new KafkaProducer<>(props);
}
return procuder;
}
}

可以在consumer的控制台看到类似输出:

1
2
3
4
5
6
7
$ docker exec -it kafka bin/kafka-console-consumer.sh --zookeeper localhost:2181 --topic test --from-beginning
NOOO.0
NOOO.1
NOOO.2
NOOO.3
NOOO.4
......

三、关于consumer

参考文档:【原创】探讨kafka的分区数与多线程消费
Kafka中,每个partition在一个consumer group中最多只有一个consumer线程能消费

代码质量

1. 在构建时加入checkstyle校验

目的

希望规范团队的代码风格,但又不希望对目前的代码冲击太大,影响代码的正常构建

checkstyle简介

checkstyle主要用于检验java的代码风格,官方支持的有sun_checks.xmlgoogle_checks.xml

maven配置

官方网站:http://maven.apache.org/plugins/maven-checkstyle-plugin/,为解决我们的目的,可以使用以下配置:

1
2
3
4
5
6
7
8
9
10
11
12
13
14
15
16
17
18
19
20
21
22
23
24
25
26
<build>
<plugins>
<plugin>
<groupId>org.apache.maven.plugins</groupId>
<artifactId>maven-checkstyle-plugin</artifactId>
<version>2.17</version>
<executions>
<execution>
<id>validate</id>
<phase>validate</phase>
<configuration>
<configLocation>my_checkstyle.xml</configLocation>
<includeTestSourceDirectory>true</includeTestSourceDirectory>
<!-- 以下两项配置表示当超过10000个警告时构建失败 -->
<failOnViolation>true</failOnViolation>
<maxAllowedViolations>10000</maxAllowedViolations>
</configuration>
<goals>
<goal>check</goal>
</goals>
</execution>
</executions>
</plugin>
</plugins>
</build>

my_checkstyle.xml的内容可以参考google的风格,自行删减。

利用docker搭建redis集群

参考文档:http://redis.io/topics/cluster-tutorial

##!搭建后的redis集群只能通过redis-cli连接使用,暂时不能对外提供访问(主要是由于redis本身的机制导致,官方文档说要将容器指定为–network=host方式)

1. 先下载redis镜像

1
docker pull redis:3.0.7

2. 构建一个支持集群化的镜像

dockerfile如下

1
2
3
4
5
6
7
8
9
10
11
12
13
14
FROM redis:3.0.7
MAINTAINER Louz
ENV REDIS_HOME /usr/local
RUN mkdir $REDIS_HOME/conf
WORKDIR $REDIS_HOME/conf
## 创建一个redis.conf文件,打开集群相关配置
RUN echo "cluster-enabled yes" > redis.conf
RUN echo "cluster-config-file nodes_6379.conf" >> redis.conf
## 初始化容器时启动redis实例
CMD ["redis-server","/usr/local/conf/redis.conf"]

通过以下命令构建出镜像

1
docker build -f Dockerfile -t louz/redis-cluster .

3. 启动6个节点(3主3备)

1
2
3
4
5
6
docker run -d --name redis-node1 -p 6379:6379 louz/redis-cluster #映射6379端口,以便外部应用访问
docker run -d --name redis-node2 louz/redis-cluster
docker run -d --name redis-node3 louz/redis-cluster
docker run -d --name redis-node4 louz/redis-cluster
docker run -d --name redis-node5 louz/redis-cluster
docker run -d --name redis-node6 louz/redis-cluster

这样就启动了6个独立的redis实例,但现在还没有形成集群。可以启动一个redis-cli测试各个节点是否启动成功

1
$ docker run -it --link redis-node1:redis-node1 --rm redis:3.0.7 redis-cli -h redis-node1 -p 6379

4. 获取各个redis实例的ip

貌似redis建立集群必须要使用ip,所以先使用以下命令:

1
2
3
docker inspect --format='{{.NetworkSettings.IPAddress}}' redis-node1
......
docker inspect --format='{{.NetworkSettings.IPAddress}}' redis-node6

分别获取到6个redis实例的ip,下面假设拿到的是172.17.0.3-8

5. 构建一个用于创建redis集群命令的镜像

dockerfile如下,镜像名为louz/ruby22-redis307

1
2
3
4
5
6
FROM ruby:2.2.5
MAINTAINER Louz
RUN gem install redis
RUN curl -s http://download.redis.io/releases/redis-3.0.7.tar.gz | tar -xz -C /usr/local
RUN cd /usr/local && ln -s redis-3.0.7 redis

6. 创建集群

步骤5的镜像构建成功后,执行以下命令进入容器的交互式界面

1
docker run -it louz/ruby22-redis307 /bin/bash

然后在容器内部,执行以下命令:

1
2
3
$> /usr/local/redis/src/redis-trib.rb create --replicas 1 \
172.17.0.3:6379 172.17.0.4:6379 172.17.0.5:6379 \
172.17.0.6:6379 172.17.0.7:6379 172.17.0.8:6379

上面的--replicas 1表示每个master节点有1个slave

命令运行后出现类似的对话框:

1
2
3
4
5
6
7
8
9
10
11
12
13
14
15
16
17
18
19
20
21
22
23
24
25
26
$ docker run -it louz/ruby22-redis307 /bin/bash
root@0f1df01b4965:/# /usr/local/redis/src/redis-trib.rb create --replicas 1 \
> 172.17.0.3:6379 172.17.0.4:6379 172.17.0.5:6379 \
> 172.17.0.6:6379 172.17.0.7:6379 172.17.0.8:6379
>>> Creating cluster
>>> Performing hash slots allocation on 6 nodes...
Using 3 masters:
172.17.0.3:6379
172.17.0.4:6379
172.17.0.5:6379
Adding replica 172.17.0.6:6379 to 172.17.0.3:6379
Adding replica 172.17.0.7:6379 to 172.17.0.4:6379
Adding replica 172.17.0.8:6379 to 172.17.0.5:6379
M: 716c75b9df60ff6270271a62d2349fa2e6a84a48 172.17.0.3:6379
slots:0-5460 (5461 slots) master
M: 2795b8bb1e62ceeda936499e13c90010c4c9b5c7 172.17.0.4:6379
slots:5461-10922 (5462 slots) master
M: 0160d543fefc9a633c77d7bc7de7eb868a7706b8 172.17.0.5:6379
slots:10923-16383 (5461 slots) master
S: 78e6dafb4c4e08f41a4ef740047728b23ca730b3 172.17.0.6:6379
replicates 716c75b9df60ff6270271a62d2349fa2e6a84a48
S: 78e6dafb4c4e08f41a4ef740047728b23ca730b3 172.17.0.7:6379
replicates 0160d543fefc9a633c77d7bc7de7eb868a7706b8
S: 283474770750c161e2f22f56d7c3cac0d92c9bc1 172.17.0.8:6379
replicates 2795b8bb1e62ceeda936499e13c90010c4c9b5c7
Can I set the above configuration? (type 'yes' to accept):

回答yes后,出现类似信息即表示集群创建成功

1
2
3
4
5
6
7
8
9
10
11
12
13
14
15
16
17
18
19
20
21
22
23
24
25
Can I set the above configuration? (type 'yes' to accept): yes
>>> Nodes configuration updated
>>> Assign a different config epoch to each node
>>> Sending CLUSTER MEET messages to join the cluster
Waiting for the cluster to join..
>>> Performing Cluster Check (using node 172.17.0.3:6379)
M: 716c75b9df60ff6270271a62d2349fa2e6a84a48 172.17.0.3:6379
slots:0-5460 (5461 slots) master
M: 2795b8bb1e62ceeda936499e13c90010c4c9b5c7 172.17.0.4:6379
slots:5461-10922 (5462 slots) master
M: 0160d543fefc9a633c77d7bc7de7eb868a7706b8 172.17.0.5:6379
slots:10923-16383 (5461 slots) master
M: 78e6dafb4c4e08f41a4ef740047728b23ca730b3 172.17.0.6:6379
slots: (0 slots) master
replicates 716c75b9df60ff6270271a62d2349fa2e6a84a48
M: 78e6dafb4c4e08f41a4ef740047728b23ca730b3 172.17.0.7:6379
slots: (0 slots) master
replicates 0160d543fefc9a633c77d7bc7de7eb868a7706b8
M: 283474770750c161e2f22f56d7c3cac0d92c9bc1 172.17.0.8:6379
slots: (0 slots) master
replicates 2795b8bb1e62ceeda936499e13c90010c4c9b5c7
[OK] All nodes agree about slots configuration.
>>> Check for open slots...
>>> Check slots coverage...
[OK] All 16384 slots covered.

7. 验证

启动一个redis-cli连接其中一个节点

1
$ docker run -it --link redis-node1:redis-node1 --rm redis:3.0.7 redis-cli -h redis-node1 -p 6379 -c

输入cluster info显示类似信息

1
2
3
4
5
6
7
8
9
10
11
12
13
14
$ docker run -it --link redis-node1:redis-node1 --rm redis:3.0.7 redis-cli -h redis-node1 -p 6379 -c
redis-node1:6379> cluster info
cluster_state:ok <-- 表示集群已经可用
cluster_slots_assigned:16384
cluster_slots_ok:16384
cluster_slots_pfail:0
cluster_slots_fail:0
cluster_known_nodes:6
cluster_size:3
cluster_current_epoch:6
cluster_my_epoch:1
cluster_stats_messages_sent:162
cluster_stats_messages_received:162
redis-node1:6379>

测试一下:

1
2
3
4
5
6
7
8
9
redis-node1:6379> get key
-> Redirected to slot [12539] located at 172.17.0.5:6379
(nil)
172.17.0.5:6379> set key1 hello
-> Redirected to slot [9189] located at 172.17.0.4:6379
OK
172.17.0.4:6379> get key1
"hello"
172.17.0.4:6379>